Pin Test: Lunch Lady Peanut Butter Bars


I am not a great cook. Not an accomplished baker. (My butchering and candlestick making skills also leave something to be desired. No rub-a-dub-dubbing here.) So when I'm looking to try out a recipe, I don't take on anything too risky. No uncommon ingredients, no fancy techniques.

And yet somehow, even with the simplest recipes, I manage to foul something up. It's a special talent I have.

These Lunch Lady Peanut Butter Bars from Tried and Tried Again are simple enough. I even followed the directions exactly. (Crazy substitutions and "winging it" are my prime methods of fouling things up.)

But somehow, my chocolate frosting... was not chocolatey. Just sugary. I am blaming the fact that my cocoa was older than my marriage (6 years... that's how much I bake from scratch...). Thankfully, however, the lack of chocolatey goodness was quickly remedied by a quick layer of melted chocolate chips on top. And, for the first time EVER, I did not burn the chocolate as I melted it! Baby steps. :)


Even with this peculiar double-frosting layer, these peanut butter bars were ah-MAH-zing. Every bit like every wonderful grade school memory, minus the sweet lunch lady in the hairnet and the helping of mushy green beans.

Reading through the comments on the recipe, no one else seems to have had the same frosting trouble. So, chalk it up to my special set of culinary skills, and head on over to Tried and Tried Again for the recipe.

Have a happy day,
Lorene

Kid's Sewing Kit, version 2.0


Just over a year ago, I made the original Kid's Sewing Kit for one of my nieces. Since then, her younger sister has asked me at least twice a month if I would make one for her. I love when they love what I make for them! So, for her 9th birthday earlier this month, I finally put it together.

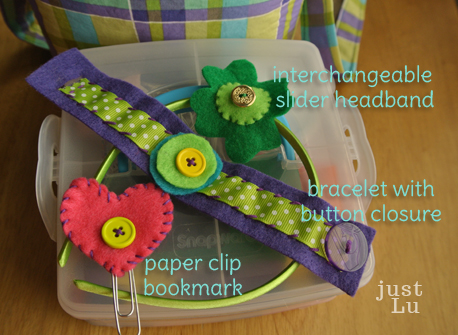
The major improvement in Version 2.0 is a sample of each project for which supplies are included in the kit. Rather than the pre-cut shapes (flowers, hearts, etc) that most store-bought kits have, I just included large pieces of felt in many colors so she can use her own creativity to decide what shapes and colors she wants for which projects. I love seeing what my creative nieces come up with!

I included three simple and skill-appropriate projects:

To make the slider headband, I just stitched a small strip of felt on to the back of the shamrock as I stitched the circle on to the front. Easy peasy, slides right on for a holiday and right back off when the holiday is over.


I picked up another snap n stack organizer from JoAnn's ($4, on sale) and put all the supplies inside:
  • darning needles in a felt needle book (on-hand)
  • embroidery floss (on hand)
  • two small spools of ribbon (clearance $1 for both)
  • a small assortment of buttons, in a tiny dollar store container (on hand)
  • paperclips for the bookmarks (on hand)
  • additional headbands ($1)
  • pre-cut felt strips for bracelets (on hand)
  • large scraps of felt in many colors (on hand)
I would recommend a pair of scissors ($1-2) as well, but I forgot until ten minutes before the party. Oops!

So, my total was $6, but even if you need to buy more of the supplies, you're still looking at an awesome diy gift for the young girl in your life for around $10. 

A few days after I gave this to my delighted niece, her sister attended a "Sew 7" birthday party where each guest had a sewing machine provided to sew a cute little gift bag and a couple other projects. A mini version of this kit would be a fun party favor for a sewing birthday party! 

I grew up sewing and learned most everything I know from my mom, who sewed everything -- including my oldest sister's jeans! -- back when handmade was a necessity and not en vogue. I treasure my basic sewing skills and I love passing the sewing/creating bug on to the next generation. 

Did you grow up sewing or learn as an adult? or are you still a non-sewist? 
(It's okay, I won't judge :)
-Lorene


Toffee Apple Dip


Warning: even though you eat it with apples (or strawberries or other fruit)... this dip is not good for you. It is fats and sugars working together to reach the pinnacle of simple deliciousness.

But all warnings aside... this dip is totally worth it! You can use fat free/reduced fat cream cheese and reduce the amount of sugar to help lower the calorie content, without affecting the taste or texture. This is my go-to party dip because it is quick to put together and it's popular enough that I never end up bringing any home :)

In a medium bowl, mix
  • 1 - 8 oz block of (softened) cream cheese
  • 1/4 to 1/2 cup brown sugar
  • 1/4 to 1/2 cup granulated sugar
  • 1 tsp vanilla
Once the cream cheese and sugars are mixed well, stir in half a bag of toffee bits (approximately 1 cup -- I use Heath bits, found by the chocolate chips on the baking aisle).

I love to serve this dip with a variety of sweet and tart apples for variety, but Debra loves it with strawberries. I'm pretty sure it makes every fruit better :) To keep the cut fruit from going brown before I serve it or throughout the party, I put a little bit of lemon juice on them. This does make the fruit taste a little lemony (which I don't mind at all) but for the next party, I'm going to try one of these four ideas from The Yummy Life to preserve them without messing with the flavor. 

-Lorene

Bathroom Organization, Pinterest Style


I don't love cleaning (how many people really do?) and I am a bit of a hoarder, so spring cleaning at our house always starts first with spring organizing. I love making the different areas of our home work for us and our stuff and our habits, which means allowing for a little bit of laziness for my husband, our two young kids, and me... mostly me. If it is too much work, none of us will do it. So, rather than making new and totally different habits, I prefer to just slightly alter existing (lazy) habits so that the odds of the new habit "sticking" are greatly improved.

Case in point: my bathroom counter. This is our shared family bathroom, so everyone's stuff is here. Most of it is mine. And I am a habitual leaver-outer. If there is something I use every day, I am very unlikely to put it away if it takes more than half a second. Combine this with my 18-month-old daughter who is a habitual drawer-emptier (thus making drawer storage undesirable), and our bathroom counter was a disaster every day.

I should be more embarrassed about this photo than I am. It is staged but not exaggerated. In reality, there would have been a couple more items on the counter and the counter would have been waaaay dirtier because you can't wipe it down very well with all your stuff all over it, right? ;)

I loved this user-uploaded idea on Pinterest, and I love IKEA. (Not sponsored, just true and honest love.) For around $10 and 10 minutes installation time, I made a great countertop transformation:
All of these items are part of the Bygel organization series.
Love it! The rail gives me a place to hang the squirt bottle I use to do my daughters hair and my glasses, and I can clip smaller things like tweezers and nail clippers right on the side of the bins. I can slide my smaller mirror down between the rail and the bin (safe from my my narcissist children who have broken 2 mirrors in the past year. so much bad luck!). 

With the smaller items off the counter, I just had my hair stuff left. I grabbed some magazine/file holders (on-hand and ugly, but you can get cuter ones pretty much anywhere) to organize hair products and styling tools under the sink (thanks to the idea from Keeley MacGuire found via Pinterest).

I still have to overcome my laziness and take the time to put things away in their places, but they *have* places and designating places cleared up a lot of space for other things.

Another area of frustration in our bathroom was the bath toys. They were just sitting next to the tub in various bins and baskets. We had quite a few and our kids loved them all, but they almost never played with them because they couldn't reach them from in the tub and I hated the puddles of water on the floor from them tossing dripping toys back in the baskets.

Inspired by this user-uploaded pin, I grabbed an extra shower curtain rod and hit the dollar store for three baskets and a set of shower curtain rings and now we have this:

So far, it is working great. A small amount of water stays in the baskets, but it hasn't caused any problems yet. If it does, I plan to just drill a couple extra holes lower on the baskets so the water can drain better. The only concern is that our petite little girl can't reach the toys in the baskets without standing up, so we have her choose her toys first while we are there holding her hand and then she can play without standing up and risking a fall. We might move the rod lower, as well.

The only problem with the new organization is that it makes the other clutter spots in our house that much more noticeable and irritating. But little by little, we are getting used to our space and making it work for us... and our laziness... ;)

What have you been organizing lately? I love new ideas, so please share!
-Lorene

Lucky Milk Lid Specimen Art

Goodness, this week has flown by! We've been organizing up a storm, and I'll have some fun projects to share next week. Today I want to share a super fast update to the milk lid specimen art from last week.

My friend Amy suggested that I paint one of the milk lids gold to make it pop and be more festive, but... paint sounded like work. And drying time. So instead I cut a four leaf clover from some brushed gold vinyl (using my Silhouette... I'm old-school SD not new Cameo :), and stuck it on one of the milk lids.

As a bonus, the vinyl will peel right off once I decide to take the art down and let my kids have their milk lids back to play with. But... let's be honest... those kids are never getting these green milk lids back. And the other colors are in danger, too, because momma is loving on how easy and cheap milk lid specimen art is! Next time, though, I think I will leave some space between the milk lids to give it more of a specimen feel. And there will be a next time. :)

Happy St. Patrick's Day!
-Lorene


Yardstick Photo and Decor Hanger (plus St Patrick's Day decor on the cheap)

Remember my two free printables earlier this week? I had every intention of just tossing them in some frames and putting them on my mantel. But then I had a midnight-hour realization: I have no 8x10 frames in my house. Not just no empty-able frames. NO frames. So I started rummaging around and came up with a few office supplies and that turned into this:


It is not what I first envisioned, but I am totally in love with it and can't wait to use it for other holidays, too!

Want to make one of your own? You'll just need
  • a yardstick
  • washi tape (optional, if your yardstick is vintage/pretty i.e., not covered with business info)
  • paper clips (large are better)
  • string (I used baker's twine)
  • hot glue or tape
If your yardstick has unsightly business info all over it (not that Sunroc isn't a great business! love Sunroc :), cover it with washi tape. I was going to leave the measurement side uncovered, but I didn't love that look, so I put two strips of gray polka dot and one strip of pink stripe to jazz it up and help cover the numbers/logo better.


Now, to make the hangers. I call this the poor man's midnight photo hanging solution ;). 

Slightly bend the center section of the paper clip out to form a little hook and tape it on to the yardstick, putting the tape behind the section you just bent out. Note: as I was typing this my shamrock fluttered to the ground... so I'd suggest using tape stronger than washi tape or multiple pieces. You could easily hot-glue the paper clips to the yardstick as well, but I wanted mine to be movable in case the things I want to hang next time are different sizes. 

Then hot-glue a short section of string, knotted at either end to keep it from unraveling and to help hold it in the glue, to the back of the photos and/or lightweight decor that you want to hang. Be sure to glue the string down far enough on the hanging item that the paper clip won't show at the top. (I also glued my photos to poster board to keep them from bending while they're hanging.) 

Having to stretch and use what I have on hand really gets my creative engine going sometimes, so I kept going with the green projects, using what I have on hand. Up there at the top of my yardstick display, I have a crepe paper shamrock. 

I found a shamrock coloring page, traced it on cardboard (the lid of a donut box ;), and then cut it out and glued random spirals of squished and twisted crepe paper streamer until it was covered. Don't look too closely or you'll see the leftover hot glue strings ;)

Hanging next to the yardstick display on our weird stair wall, I just glued some yarn (freehand, in case you can't tell ;) to say lucky... and that is supposed to be a clover on the tail of the y... (The frame is one that I won a while back from Janny at Que Linda. She even gives you the tutorial here! I love it and it fits the holiday perfectly!)


I have one shelf on our front room bookshelf that I put seasonal things on:
An Easter chick masquerades as a leprechaun using the hat I made for my son when he was a baby, and it wouldn't be St. Patrick's day without a pipe cleaner rainbow and the traditional cotton ball clouds!

And then I was on to my mantel. I have only had a mantel for about 6 months and I am still getting a feel for my mantel style... but this one is my favorite yet! Simple but festive. And all from things sitting around my house. Sometimes it pays to hoard ;)
 Just ignore the extra rustic feel... the mantel still needs painted :) From left to right:
  • Hurricane jar with coiled dollar store garland inside, on top of two dollar store bowls
  • Recycled mini Martinelli's bottles with dollar store flowers (whose stems are lengthened with drinking straws)
  • Plain candle on a candle holder, dressed up with more washi tape
  • Milk lid specimen art in white Ribba frame from IKEA
  • Clock from Deseret Book a year or so ago
  • My only still-living plant, in a thrifted ceramic teapot that is normally in my kitchen (propped up with a recycled orange juice concentrate container)
My favorite part? The milk lid specimen art!

So easy. I covered a piece of cardboard with burlap and then just glued the milk lids to it and popped it in the frame. It adds a great color, and I'm thinking how fun it would be with many colors of milk lids. 

Oh, and I don't normally hoard milk lids. I collect them. For my kids. Really, they are great for putting in and out of a wipes container (thank you, Pinterest and Learning Through Play!) and for counting and sorting and stacking. So I put a very small amount of glue on them so my kids won't be green-deficient next time they play ;)

So, how are you decorating for St. Patrick's Day this year? Or are you skipping it since Easter is so close on its tail?

Have a happy {green} day!
-Lorene

An Irish Blessing or Two | free printables


I am generally very slow about getting our holiday decorations put up and taken down. Just ask Debra -- I once had our Christmas tree up from the week before Christmas (as my husband's birthday tree) until Easter. The tree was redecorated for all the holidays in between, at least ;)

St. Patrick's Day is approaching, as I'm sure you know. But this is one of those weird years when Easter is actually in March (the 31st), so the Irish decor is going to have to come down after my kids go to bed on the 17th so my Easter decor can get as much time in as possible. I love Easter because it means SPRING!

So I'm resorting to the best of quick-and-dirty holiday decorating: printables! I love the wording of some of the Irish blessings I've seen around, so I took two of my favorites and made 8x10 printables for myself and to share with you. (If you're interested in other sizes, drop me a line.) Download the full-res images by clicking on the pictures or the download links -- your downloads do not have my logo on them. :)

Irish Blessing #1

May your troubles be less and your blessings be more and nothing but happiness come through your door
credits | font: Tork | frame shape: StarSunflower Studio | background: Elemis Freebies
download here -- yours will NOT have my logo on it

Irish Blessing #2

May flowers always line your path and sunshine light your day. May songbirds serenade you every step along the way. May a rainbow run beside you in a sky that's always blue. And may happiness fill your heart each day your whole life through.
credits | fonts: Tork and Gruenewald VA | rainbow image: OCAL on clker.com
download here -- yours will NOT have my logo on it


Feel free to pin and share these, but please share this post and not the download pages. 
As with everything I share here, these are for personal use only, please. 

Happy decorating! If you use these in your home, let me know -- I'd love to see how you use them! I'll be sharing what I've done with mine soon, too :)

-Lorene

I'm sharing this at
   Keeping It Simple

$6 Faux Wrought Iron Triple Frame


Ages ago, long before the hiatus, I fell in love with toilet paper rolls. It was a match made in heaven -- something free that could be turned into something beautiful with just a little creativity, elbow grease, and spray paint.

I collected for months and then, inspired by the turquoise tp art by The How-To Gal and the faux metal filigree frame by Suzy's Artsy-Craftsy Sitcom that I stumbled upon thanks to Pinterest, I cut and glued and made my own. This hangs right by my front door, and everyone remarks on it and is completely astonished that it is made from toilet paper tubes.

Instead of having the frames sit on top of the cardboard filigree like Suzy's, I wanted to have the frames blend right in so that the whole frame looked like one continuous piece of (faux) metal. I already had two of these thin black front-loading "quick frames" kicking around, and, after much searching, I finally found a matching one at Hobby Lobby so I could have one large (11x14) frame flanked by two smaller (5x7) frames.

I followed the same basic construction steps as The How-To Gal: collect toilet paper (or paper towel) tubes, flatten them and cut them into slices, and then start gluing! I cut the slices the same depth as my frames -- just over 1/2 inch. I used white tacky glue and glued my flattened circles into flower shapes first, 4 slices coming together at the center.


Once I had a significant number of flower shapes (close to 50), I laid out my photo frames and determined how many flower shapes it would take to span the width/length of each frame, and how many to put in between the frames and above/below the largest frame. I put one row of flowers above and below the largest frame and one row in between the frames, so I ended up with a design that is 11 flower motifs wide by 6 flower motifs tall.

The 11x14 photo frame is just wider than 3 flower motifs, but the open work of the design allows for some flexibility to stretch a bit, so it's not even noticeable.

The 5x7 photo frames are 2 flowers tall but only 1.5 flowers wide, so I had to have a few partial flowers to fill in the extra halves around the outside edges of the frame.

After everything was glued and dried, I very carefully transported the frame outside for 2-3 very light coats of black spray paint. The frame is surprisingly sturdy when laying or standing, but any twisting will tear it right to pieces and put me to tears. (When we moved, this frame and my intersecting circle art were personally transported by me in the passenger seat of my car, my most prized possessions and the ones that I would have been devastated if they had been ruined!)

To mount the frame on the wall, I first hung the frames where they should be, starting with the largest frame in the middle of the wall at the height I wanted and then using the cardboard part of the frame to determine where the smaller frames should go. The frame sags a little bit, so hang the frames just a little higher than the frame determines, or have a second pair of hands help hold up the sides of the frame while you mark where the frames should go, so that it will be level on the top and bottom.

Once the 3 photo frames were hung, I just slipped the cardboard frame right over the top. It stays put nice and snug, but over time gravity took a bit of a toll and the bottom started to sag (it happens to all of us, right? darn gravity). To remedy this, I put a small support nail on the outside bottom corners of the two 5x7's and the bottom corners of the 11x14. I used a black Sharpie to color the head of the nail so that it blends in to the black frame. If I were to do something like this again, I would either use 3M mounting squares like The How-To Gal or build a thin balsa wood support frame just around the outside edges of the photo frames like Suzy did for her faux metal wall art.


Since I only had to buy the one 5x7 frame (with a coupon) and the black spray paint, my total out of pocket cost was $6! Buying all 3 frames (such as from Hobby Lobby) would only set you back $12, so even if you had to buy the spray paint and glue, you're still looking at under $20 for a great piece of statement art -- and much less if you can use coupons and catch a sale! And it didn't take too long, either -- I'd say 3-4 hours total time, plus the time for the glue and spray paint to dry.

After I made this, my husband was thrilled to not get in trouble for throwing away (in the recycling bin) toilet paper tubes. But now that we are in our new house with more wall space, I'm back to religiously saving every tube. I think my next project will be a mirror like this one by Made2Style to hang in our master bedroom:

(You can find this and more great ideas for using toilet paper tubes and other recycled materials on my reduce reuse recycle board on Pinterest.)

Thanks for reading!
-Lorene

I'm sharing this at
   I'm Topsy Turvy

And that's what they call a hiatus...

So... you probably didn't notice, but I've been away. I mean, not many of us notice when posts from one of the many blogs we follow just stop showing up in our readers. I usually don't.

I never intended to not be blogging. I just never actually blogged. At first I was just having a frustrating creative block. Once I got over that, I did plenty of creative things worth sharing. I thought about blogging. A lot at first, and then not so often as I merged back into the real world, that strange place where people rarely, if ever, stop every step along the way to take photos for a tutorial.

And then we bought our house (after months of waiting).
Our first real home task was dealing with a creeper.
Thankfully the "creeper" at hand was a  pesky vine and not a lurking neighbor ;)

And Debra moved much closer.
I got to be Debra's guest at the opening of the new DownEast store in Tooele. So fun and such a great store!

And suddenly all my creative zeal and energy that had been missing for months was back! Now my head is swimming with more ideas than I can ever afford to bring in to reality in the 24-hour days we mortals have to function in. But it's good to be back :)

-Lorene

PS -- I redesigned this lil ol' blog, so you really should come visit and see the new look! And you can follow me on Pinterest, too, if you want. 
Related Posts Plugin for WordPress, Blogger...
 
Blogging tips