
I practically never post twice in one day, but I want to give you the rest of the instructions for the felt game board in a timely manner and if I don't post them today, they might end up forever in the

Felt Game Board {tutorial} part 2
It's a tutorial fest around here! (If you haven't already, go check out my tutorial for paper filigree Christmas trees over at Gwenny Penny for Haul out the Holly.)
I practically never post twice in one day, but I want to give you the rest of the instructions for the felt game board in a timely manner and if I don't post them today, they might end up forever in theblack hole draft folder. :)
I practically never post twice in one day, but I want to give you the rest of the instructions for the felt game board in a timely manner and if I don't post them today, they might end up forever in the
Haul Out The Holly with my Filigree Tannenbaums
Yes! It is time to Haul Out The Holly! The event, hosted by the fabulous Gwen of Gwenny Penny, started yesterday and it's my tutorial today!
Be sure to pop over and learn how simple it is to make these lovely filigree tannenbaum (fancy talk for quilled paper Christmas tree ;) earrings and decorations:

And there are 10 more days of fantastic bloggers to come, so stay tuned for the whole Haul out the Holly event. Thanks to Gwen for hosting!
Felt Game Board {tutorial} part 1


This game board is easy on your wallet (around $5 depending on your choice of materials and selection of on-hand) and easily customizable for boys or girls. The board features tic-tac-toe on one side and checkers on the other. Pieces are stored in attached pockets and then the entire board rolls up for on-the-go play or stuffing in a stocking. Want to make one? Here's how I did it:
But first... yes - I know that there are probably easier ways to achieve what I've done here. I do things to meet a vision and that vision doesn't always coincide with simplicity. Usually simplicity smacks me in the face halfway through, or occasionally after, completing a project. If you would like to be the hand of simplicity (the one that smacks me), feel free to leave me a comment. :)
Felt Game Board
for personal, non-commercial use only
What you'll need:
- 1 - 12" square of felt for the tic-tac-toe board (with 1/3 of a yard of 72" felt you'll be able to make 4-6 of these babies, depending on if you use yardage or felt sheets for the straps)
- 2 - 3"x12" felt pieces for the straps
- 2 - 2" pieces of sew-in hook and loop tape (velcro)
- 4 - 12" lengths of grosgrain ribbon, with the ends either heat-sealed or fray-checked
- 2 full sheets of 9x12 felt for the pockets to store the pieces in
- 2 to 4 full or partial sheets of felt for the game pieces and checkerboard
- appx 3/4 yard of fusible web, like WonderUnder or HeatNBond
- 1 - 12" square of contact paper (you can find a roll of it at the dollar store!)
- Printed game pieces pattern
- 4 to 49 buttons (4 required, 45 optional - I used them because that was my vision, but my nieces never use the buttons when they play :)
- Sewing supplies: iron, sewing machine, needle and thread
What you'll do:
Make the tic-tac-toe board
1. On the 12" square of felt, make small marks at 4" and 8" on all 4 sides.

2. Lay one ribbon straight across from one 4" mark to the opposite 4" mark and sew it down.

3. Repeat with the other ribbons, sewing them at the perpendicular 4" mark and the two perpendicular 8" marks, to create a tic-tac-toe grid like this:

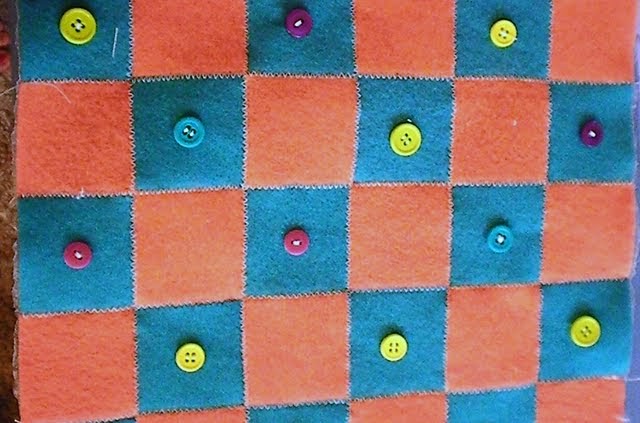
4. (optional) Sew one button in the middle of each square:

Make the checkerboard
1. Cut two different colors of felt into 18 - 2" squares, for 36 squares total.
2. Peel the paper off your contact paper to expose the sticky side. (I peeled the paper back in two sections.)

3. Starting at one corner, gently stick the felt squares to the contact paper, alternating colors to create a checkerboard:

4. If needed, trim the edge squares so that the whole board is more perfectly square.
5. Cut a 12"x18" piece of fusible web.
6. Place the pieced-together checkerboard with the contact paper down on your ironing board.
7. Place the fusible web, fusible side down, on top of the checkerboard, lining up the 12" edge and leaving about 6 inches overhang on one end.

8. Iron and fuse the fusible web to the felt. You'll probably want to use a lower heat setting for a longer time than the instructions on the package suggest to avoid melting the felt.

- I'd suggest doing a test-iron with scraps of felt and contact paper to be sure that your contact paper won't melt.
- You may also want to use a press cloth to ensure that you aren't melting the felt. I didn't use a press cloth, and I ironed at a higher temperature, but I slightly melted my felt because I'm impatient like that. :)
10. Use a zigzag or other joining stitch to top-stitch the checkerboard squares.

11. (optional) Sew a button in each checkerboard square:
Make the game pieces
I chose to make double-sided game pieces for both games and show that here. To make single-sided game pieces, just cut the suggested pieces from felt (I'd suggest a freezer paper stencil), and skip the entire fusible webbing and top-stitching bit.
1. Print the game pieces pattern.
2. On the paper side of the remaining fusible web, trace
- 5 large Xs
- 2 small Xs
- 5 large Os
- 2 small Os
- 14 circles
- 12 crowns
4. Iron and fuse the traced shapes onto your felt, making sure that the large Xs and Os are different colors, that the two groups of circles are different colors, and that the each small X and O is a different color (to coordinate with the two different colors that the large Xs and Os will be when double-sided).

- Be sure that you are reserving two full sheets of felt for the storage pockets (instructions in part two of the tutorial).

6. Set aside the small Xs and Os and 2 circles, one of each color, to be used for pocket embellishments (instructions in part two of the tutorial).
7. Peel the paper from each crown and fuse each crown to one of the circle pieces.

8. Secure the crown by stitching a few stitches in the center of the crown.

9. Peel the paper from the fusible web on the pieces -- 5 large Xs, 5 large Os, and 12 circles with crowns -- and fuse each piece to another layer of felt. Fuse the Xs and Os to a different color of felt and the circles to the same color of felt.

10. When the fusing has cooled, cut out and top-stitch each piece, sewing around the edges of the circles and Os and an X shape on the Xs.
11. (optional) Cut buttonholes in each piece:

And that's it for now... Check out Part 2 to finish up: making the straps and pockets and assembling the game board.
Have a wonderful day!


and so flattered to be featured at

Google Reader
Can you believe it's Wednesday? and that Thanksgiving is tomorrow? Time flies! It is Wednesday whether you believe it or not, so I'm over at Housewife Eclectic with the basics of Google Reader. Hope you'll stop by!
Happy Thanksgiving!
Happy Thanksgiving!
Mmm Mmm... Potato Chowder
Happy Monday! I hope you have all started off your week well. There's snow on the ground here (it's finally sticking!), so that means I am to my favorite cooking part of the year: soup time! We love digging in to a bowl of hot, creamy thick soup, so we eat well during the colder months.
I'm still crafting up a storm for my holiday gift-giving, but... most of the recipients read this so I can't really share with you just yet. :) Even though I can't share some of the projects that I'm most excited about until after Christmas, I have a few fun things coming up: the tutorial for this felt game board that I shared ages ago and remember how Haul out the Holly is just one week away?!? You're gonna love it! But for today, a yummy and easy (since I allow no other type in my kitchen) soup and a big thanks for my friend Ann for the recipe.

Potato Chowder
serves 5-6
What you'll need:
3 cups cubed potatoes
1/4 tsp (to taste) onion powder
1 can cream of chicken soup (or make your own like in this recipe)
1 cup (8 oz) sour cream
1 3/4 cup milk
8 slices deli ham, cut up
1-2 Tbsp parsley
*Here is my obligatory note telling you that I don't actually usually measure the ingredients and/or follow the recipe: I add more soup/sour cream as I feel like it, I use leftover ham-from-a-bone when I can, and I almost never add the milk because we love our soups extra-thick.
What you'll do:
1. Cube potatoes and put in a large pan. Fill pan with water until it just covers the potatoes. Bring to boil and boil until potatoes are tender (I like mine fall-apart tender for a thicker soup).
2. Reduce heat and DO NOT DRAIN potatoes.
3. Add onion powder, cream of chicken soup, and sour cream. Stir until well mixed and add milk (if desired).
4. Add parsley and ham and heat through, but make sure it doesn't boil.
5. Serve! Especially yummy with fresh rolls -- I'm auditioning these and these for Thanksgiving dinner.
More about feeds and feed readers @ Housewife Eclectic

Savvy & Scumble {book reviews}
I finished an amazing book this weekend and I am SO excited to tell you about it and its companion novel:

Savvy and Scumble are two wonderful companion novels written by Ingrid Law. They follow two young adults (I'd say kids but I'm not sure that 13-year-olds still count as kids...) from an extraordinary family: on their 13th birthdays, people in the family receive a gift, a special power called a savvy. Each person's savvy is different (and amazing!) and each person must learn how to control or scumble the savvy they receive.
Savvy is the story of Mibs Beaumont, a middle child in a savvy family. Just before her 13th birthday, her special savvy birthday, her father is in a car accident and ends up in a coma. Mibs is determined that her savvy can help save her father, but he is in a hospital two hours away. In her journey to reach her father, Mibs ends up on a pink bus with a traveling bible salesman, her brothers, and the local preacher's kids -- a cute boy and his obnoxious older sister.
As she travels, Mibs learns a thing or two (of course... what book is there where the protagonist ends the story the same as she began it?) about savvies, people, life, and herself. Any reader -- old and young, male and female -- can see a bit of themselves in Mibs, who, aside from her savvy, is completely normal and UNperfect, a tween just trying to find herself.
Scumble tells the story of Ledger Kale, Mibs' cousin, nine years after Mibs' savvy journey. Ledge, as everyone calls him, has hoped his whole life for a specific savvy and is completely and utterly disappointed when his savvy birthday presents him with a different savvy. He labels himself a dud and then must try to scumble (control) his savvy right away in order to attend a family wedding two states away.
Ledge mingles with the rest of the savvy clan -- including an insect whisperer, levitating twins, and an electric cousin -- and becomes more frustrated with his savvy -- "useless as a pogo stick in quick sand." But with the help of the same wacky clan and a new frenemy, Ledge learns what it means to scumble and comes to terms with who he is in the world, savvy or not.
Final word: A+. I recommend these books to anyone. That means you. Read it yourself, read it to your kids, hand it to your kids to read. Law has an amazing savvy of her own for telling heartfelt and entertaining stories that appeal to everyone, in a setting that is a perfectly magical blend of reality and fantasy. Seriously, go get the books now. You won't be sorry.
Rock & Roll Earrings {tutorial}
I originally shared this tutorial over at twelve crafts till Christmas for Stuff Your Stockings Saturday. Just reposting it again here because I looove it so much. Enjoy!
Today I am so thrilled to share with you one of my favorite and easiest projects: rock & roll earrings.

I got in on the stamped washer craze at the beginning of summer, just like every other craft blogger. I was inspired by Polly's stamped washer earrings at Helping Little Hands, but after I made mine, I felt they they were just needing a little something extra. For me, that little something was a cheap piece of plastic otherwise known as a guitar pick.
The little lovelies are perfect for the moms, sisters, girlfriends, daughters, grandmas and all the other women on your Christmas list. For the die-hard (or wannabe, like me) rock and roll fans, the original classic rock and roll set fit the bill:

For those outside the rock and roll set, you can glam up the washer with some pretty paper and glaze to elevate the guitar pick from classic rock to haute couture:

So, let's get started...This looks like a bunch of supplies and an overload of instructions, but I promise that it isn't difficult and really won't take long (except for the glaze drying). I'm showing you both the classic rock and the haute couture versions today, and my technical-writer heart just loves lists. :)
An almost-Grimm modern web fairy tale
 Good morning! This week, I've been making like a Grimm -- I hope you'll like my modern web fairy tale: Goldilu and the Three Feed Readers that I'm sharing today over at Housewife Eclectic (yup, Wednesday already!).
I've found my feed reader happily ever after -- have you? Or are you still searching for your prince among feed readers? Come read the story, see nigh-unto-embarrassing pictures of yours truly, and find some princely feed reader options.
And just in case you think I pick only the dumbest pictures of myself to share over at Housewife Eclectic... I have a special selection of my idiotic-looking self-portraits that didn't make the cut into today's fairy tale exclusively for your viewing pleasure:

How to Never Mail an Elephant
Remember this little fellow?
Well, I finally got up the gumption to put him in the mail so he could meet his intended owner, my sister Greta, who lives in wet and beautiful Oregon.
So, in case you ever find yourself in the same situation, here's what to do.
 1. Buy the largest mailing envelope known to mankind.
2. Wrap the elephant in packing paper, conveniently repurposed from your recent *free* merchandise.
3. Cut two rectangles of cardboard just larger than your elephant and just smaller than the largest mailing envelope known to mankind.
4. Make an elephant sandwich with the cardboard and...
5. Wrap the cardboard-elephant sandwich with a generous layer of packing tape.
6. (optional) Scrawl your heartfelt note on the cardboard-elephant-tape sandwich.
7. Slide the cardboard-elephant-tape sandwich into the largest mailing envelope known to mankind.
8. Peel and stick the adhesive part of the largest mailing envelope known to mankind and then proceed to apply more tape because you know you (meaning I) can't trust that adhesive. This is an elephant, after all.
9. Drop the elephant in the mailbox (with proper postage, of course) and then go home and read the classic Never Mail an Elephant, written by Mike Thaler and illustrated by Jerry Smith and be glad you mailed a cardboard elephant with no flesh or bones or feelings.

PS -- Gwen, Laura, and Jocelyn, your giveaway loot is en route.
(Rhyme on purpose)
 |
| Yes, I decided he is a he. No matter now, since I am no longer his owner... |
So, in case you ever find yourself in the same situation, here's what to do.
How to Mail an Elephant
2. Wrap the elephant in packing paper, conveniently repurposed from your recent *free* merchandise.
3. Cut two rectangles of cardboard just larger than your elephant and just smaller than the largest mailing envelope known to mankind.
4. Make an elephant sandwich with the cardboard and...
5. Wrap the cardboard-elephant sandwich with a generous layer of packing tape.
6. (optional) Scrawl your heartfelt note on the cardboard-elephant-tape sandwich.
7. Slide the cardboard-elephant-tape sandwich into the largest mailing envelope known to mankind.
8. Peel and stick the adhesive part of the largest mailing envelope known to mankind and then proceed to apply more tape because you know you (meaning I) can't trust that adhesive. This is an elephant, after all.
9. Drop the elephant in the mailbox (with proper postage, of course) and then go home and read the classic Never Mail an Elephant, written by Mike Thaler and illustrated by Jerry Smith and be glad you mailed a cardboard elephant with no flesh or bones or feelings.
(Rhyme on purpose)
Haul out the Holly {and get in the holiday spirit}
I love this time of year in the blogosphere because, amongst all the regular goodness, it seems like everyone adds in a little something special for the holidays. So, I just wanted to let you know about a few things that are getting me in the holiday spirit...

Gwen has rounded up eleven great bloggers (maybe only ten great bloggers and then me? that's how I feel with this awesome lineup!), and beginning November 29, she and each of the bloggers will share a tutorial each day to get you ready for the holidays. Trust me... you'll want to be there.


Gwen has rounded up eleven great bloggers (maybe only ten great bloggers and then me? that's how I feel with this awesome lineup!), and beginning November 29, she and each of the bloggers will share a tutorial each day to get you ready for the holidays. Trust me... you'll want to be there.
All the cool kids will be there:
Amy from Ameroonie Designs
Amy from Increasingly Domestic
Andi from Jane of All Crafts
Anna from Noodlehead
Cecily from Craftopotamus
Jess from Craftiness is not Optional
Kindra from At Home With K
KJ from Let's Go Fly a Kite
Kristin from Betty Crocker Wannabe
Lorene from just Lu <---that's me!! ahh!!
Megan from Fowl Single File
so you should be too. :)
So mark your calendars for Haul out the Holly, and, in the meantime, you can join me at these two other holiday blogvents (yup, just made that word up).
No. 17 Cherry Tree Lane, on top of having possibly the coolest blog name EVER, is hosting Thankful on Paper this month. Thankful on Paper is all about giving gratitude a place in our lives this Thanksgiving season by letting people know that we are grateful for them (plus, you get to display that beautiful button for participating -- win-win!). Here's what to do if you want to participate (directly from No. 17 Cherry Tree Lane):
*The 4 Wednesdays (beginning on Nov 3rd), leading up to Thanksgiving, I'm going to write one person and tell them I am thankful for them and why. I will send it to them them that day (or drop it off at their house) and hopefully express to them how much I care for them and how grateful I am that they are in my life. I would love you to do the same.
*The 4 Thursdays (beginning on Nov 4th), leading up to Thanksgiving, I will write a simple blog post about who I wrote to and why. On those Thursdays, I would love for you to join me and write a post. I will link to each of your blogs on that Thursday so that others can visit your site and be inspired. (I am potentially going to do a LINKY, but might just do it myself as well, not sure). If the person is someone you would like to keep private, that is also fine. You can opt out that week or write a general post keeping it private, but sharing some sentiment of Thankfulness.
*The 4 Thursdays (beginning on Nov 4th), leading up to Thanksgiving, I will write a simple blog post about who I wrote to and why. On those Thursdays, I would love for you to join me and write a post. I will link to each of your blogs on that Thursday so that others can visit your site and be inspired. (I am potentially going to do a LINKY, but might just do it myself as well, not sure). If the person is someone you would like to keep private, that is also fine. You can opt out that week or write a general post keeping it private, but sharing some sentiment of Thankfulness.
*It's as easy as that!
Okay, yes... I am already behind. But I've almost got my note written and once I do I'll definitely share. Better late than never, especially with worthwhile things like gratitude. :)
And last but certainly not least this holiday season -- The oh-so-talented Linda over at Craftaholics Anonymous is yet again hosting her Handmade Gift Exchange. The woman just had an adorable baby and she is already coordinating a fantastic gift exchange, and actually two since there are separate exchanges for US and international residents. Wow am I an underachiever. :)
The gist of the Handmade Gift Exchange is that you make something (thus the handmade part) that you send to your designated partner (thus the gift part) and your partner will also make something (doubling the handmade part) and send it to you (doubling the gift part and completing the exchange part).
If you want to join in, you can read all of the details here at Craftaholics Anonymous. You have until November 10th to sign up, and your gifts must be post-marked by November 30 -- and handmade doesn't need to be extravagant! (Remember, it's going in the mail.) You can see what items have been part of previous gift exchanges here.
If you want to join in, you can read all of the details here at Craftaholics Anonymous. You have until November 10th to sign up, and your gifts must be post-marked by November 30 -- and handmade doesn't need to be extravagant! (Remember, it's going in the mail.) You can see what items have been part of previous gift exchanges here.
Welcome to the holiday season!
whether you want to be here already or not. :)
Shutterfly Holiday Cards {you can get 50 free!)


Not only do they have everything you could ever want to put a photo on, they have cute pre-designed layouts (seriously cute… none of those ugly ones where even I could have done better) and competitive prices. Their photo books start at $12.99 and prints start at 15¢ (9¢ for pre-paid plans) and they almost always have a promo for at least one popular item – woohoo! Plus, all the photos you upload to Shutterfly are stored at full-resolution, so, if the unthinkable happens and, say, your computer crashes, you'll still have those photos (and unlimited FREE photo storage).

My first (and only finished) photo book experience was with Shutterfly and I am SO pleased with the resulting book. The fact that I finished it tells you wonders -- every other photo book I've started creating with another company is still unfinished because their pre-made designs and software are either too rudimentary -- not enough options to keep me satisfied -- or too complex -- so many options I don't know where to start!
Shutterfly’s easy online creation program and excellent pre-made designs combine to make it fast and easy to create anything, from a 20+ page photo book to a single holiday card, and make it look amazing and professional. Their new photo uploader is fast and easy to use, even if you don’t have blazing-fast internet, and interfaces easily with Picasa… and we know how much I love Picasa!

So, as you’re shopping for fantastic holiday cards to send with your annual here’s-what-we’ve-been-up-to family letters (or to send in lieu of said letters), look at Shutterfly’s Christmas cards and holiday cards. Here are some of my favorite designs -- all you have to do is toss in a picture and your text and you're set!
 |
| holly frame & starlight joy |
 |
| christmas letter & frosted frame |
 |
| mod snowflakes & bright colored lights |
And, when you sign up for a new Shutterfly account now, you get 50 free 4x6 prints. I love free. :)
If you're a blogger and you also love free, go here to get the information about how Shutterfly wants to give YOU 50 free photo cards this holiday season.
Happy holidays (I can't believe I'm saying that this early...)!
Feed me, feed you, feed the world (with RSS)
Welcome to Wednesday! Can you tell that something is different? Well... if you're reading this in a feed reader (like Google Reader) and you can't tell that anything is different -- good!
I switched my blog's feed to Feedburner yesterday. That just means that I now have access to stats about you in-reader readers, even if you don't click over to come visit me here at just Lu (which I'd still love for you to do, of course). Don't worry, Feedburner can't tell me that you're still in your pjs (or tell YOU that I am also still in my pjs) or that you're having a bad hair day (me too!) -- it just tells me little stats like how many of you there are and what feed readers you're using.
You should automatically receive the updates through your regular subscription, but if for some reason you're not receiving the updates in your reader, let me know (and thanks for clicking over anyway!). And, if you're new, you can subscribe to updates in your reader or your email inbox using those two new little links over there in the sidebar --->.
 And if you're wondering what the whole feed thing is all about, come on over to Housewife Eclectic today. I've declared November, the foodiest month of the year, to be Feed Me month in my regular Wednesday on the Web (WotW) posts over there.
I'm taking the whole month of November to talk about topics related to web feeds -- publishing a feed, subscribing and reading a feed, and so forth. Today we're getting started with RSS and Feedburner -- what they are and how/why to use them. Hope to see you there!
I switched my blog's feed to Feedburner yesterday. That just means that I now have access to stats about you in-reader readers, even if you don't click over to come visit me here at just Lu (which I'd still love for you to do, of course). Don't worry, Feedburner can't tell me that you're still in your pjs (or tell YOU that I am also still in my pjs) or that you're having a bad hair day (me too!) -- it just tells me little stats like how many of you there are and what feed readers you're using.
You should automatically receive the updates through your regular subscription, but if for some reason you're not receiving the updates in your reader, let me know (and thanks for clicking over anyway!). And, if you're new, you can subscribe to updates in your reader or your email inbox using those two new little links over there in the sidebar --->.

I'm taking the whole month of November to talk about topics related to web feeds -- publishing a feed, subscribing and reading a feed, and so forth. Today we're getting started with RSS and Feedburner -- what they are and how/why to use them. Hope to see you there!
Fabric Party Hat {tutorial & free pattern}
My little Pudge-meister celebrated the big 1 about a month ago. Remember how I stayed up late working on his ensemble for his special day?
Well, I wasn't up late because it was difficult... only because I didn't start until late and I was creating my own pattern for the party hat. Which I will graciously share with you all now. :)
I made the shirt like Char makes over at Crap I've Made. I used her template (at the bottom of her post) and *awesome* applique instructions for the 1 onesie. I wanted a matching hat like hers, too, but her tutorial is for covering a pre-made cardboard party hat with fabric. I wanted an actual fabric party hat -- no buying a full 12-pack of yucky SpongeBob hats since I only wanted *one* hat anyway. Just one hat, made from just fabric, for my one special birthday boy. All of the other party hat tutorials that I could find required a cardboard party hat to make the pattern.
Finally, I stumbled across this eHow tutorial that, miracle of miracles, included calculations for the dimensions of the hat! The dimensions gave me a starting point (and yes, I did sneak in with a piece of string and measure my sleeping baby's head), but I didn't love the construction method and the finished hat seemed too tall, too "wizardish," as my husband put it.
So, I tweaked the dimensions to make my own hat. Once I had the right size, I had the hat made in under 30 minutes. It only took me another 30 days (plus some) to sit down and punch out a tutorial. :)

Fabric Party Hat
for personal, non-commercial use only
You'll notice that this tutorial has no instructional photos, and only one diagram. Yes -- this project is THAT easy. If, however, something doesn't make sense, please let me know and I will clarify. :)
What you'll need:
Create your own pattern (no pre-made hat required!) custom-sized for your party-goer
 1. Measure the wearer's head circumference halfway between their hairline and eyebrows (my baby's was 16 inches). Add two to that measurement and divide that number by 2 (16+2=18 and 18/2=9). Then draw a horizontal line (line A in the diagram) that many inches long on your cardboard piece and mark the center.
2. Draw a vertical line 1.5 inches shorter than line A (9-1.5=7.5), starting in the center of line A and going straight up (line B).
3. Create a triangle (blue in the diagram) by drawing one line from the left end of line A to the top of line B and another line from the right end of line A to the top of line B.
4. Draw another horizontal line parallel to line A and about one inch above it (line C).
5. Sketch a nice smooth curve (green in the diagram) going from the point where line C touches the triangle on the left to the center of line A (the bottom of line B) to the point where line C touches the triangle on the right.
6. Cut out your rounded triangle shape.
7. Fold your shape gently in half to be sure that the straight sides of the trianglish shape are the same length and that the curve is even. Trim the sides and even up the curve as needed.
Your finished shape is approximately 1/6 of a full circle and your pattern to success! Or at least to a successful party hat.
Make the hat
Your fabric and WonderUnder pieces need to be approximately twice the size of your pattern since you'll cut the pattern on the fold. My toddler-sized hat required an approximately 8x14 inch rectangle of each.
1. Fuse (iron) the WonderUnder to the wrong side of your exterior fabric, following the directions on the package.
2. Fold the fabric with the WonderUnder adhered and trace your pattern piece, placing one straight side on the fold.
3. Cut out your traced piece.
4. Carefully peel the paper off the WonderUnder and fuse (iron) the WonderUnder-fabric combo to the wrong side of the interior fabric.
5. Trim the interior fabric so you are left with a double-sided fabric piece that is the double the size of your original pattern piece.
6. Attach any embellishments. I just added a ribbon around the rounded edge of the hat, which will become the brim of the hat, but you could add a monogram, medallion, or myriad other cutenesses.
7. Fold the fabric exterior-sides together (to form a triangle/cone) and sew along the straight side (1/2 inch ish seam allowance) to form a cone.
8. Trim the seam allowance at the point of the cone at a downward angle (so you remove the bulk from the point of the hat).
9. Turn the hat exterior-side out.
10. Thread a sewing needle with approximately 20" of elastic thread.
11. Stitch one end of the thread to one side of the hat and then the other end to the other side of the hat (to leave a long loop) to make the chin strap. Be sure to keep the seam of the hat facing toward the back (in the middle of the two points where you attach the chin strap) while you attach the elastic thread.
Put it on your adorable party-goer's head, grab some balloons, and party on!

Sharing at these fantastic parties:


 |
| photos by the ever talented Dusty Nance Photography |
I made the shirt like Char makes over at Crap I've Made. I used her template (at the bottom of her post) and *awesome* applique instructions for the 1 onesie. I wanted a matching hat like hers, too, but her tutorial is for covering a pre-made cardboard party hat with fabric. I wanted an actual fabric party hat -- no buying a full 12-pack of yucky SpongeBob hats since I only wanted *one* hat anyway. Just one hat, made from just fabric, for my one special birthday boy. All of the other party hat tutorials that I could find required a cardboard party hat to make the pattern.
Finally, I stumbled across this eHow tutorial that, miracle of miracles, included calculations for the dimensions of the hat! The dimensions gave me a starting point (and yes, I did sneak in with a piece of string and measure my sleeping baby's head), but I didn't love the construction method and the finished hat seemed too tall, too "wizardish," as my husband put it.
So, I tweaked the dimensions to make my own hat. Once I had the right size, I had the hat made in under 30 minutes. It only took me another 30 days (plus some) to sit down and punch out a tutorial. :)

Fabric Party Hat
for personal, non-commercial use only
You'll notice that this tutorial has no instructional photos, and only one diagram. Yes -- this project is THAT easy. If, however, something doesn't make sense, please let me know and I will clarify. :)
What you'll need:
- A piece of scrap paper or cardboard about 10 inches square OR my free pattern here
- A ruler and pen/pencil
- Two coordinating fabrics, about a fat quarter each (I used scraps -- mine were about 8x14 inches each for a toddler-sized hat)
- WonderUnder (or Heat n Bond), the same dimensions as your fabric (one half yard will definitely do the job)
- Ribbon or other embellishments
- Elastic thread
- Sewing supplies: iron, sewing machine, scissors, sewing needle
Create your own pattern (no pre-made hat required!) custom-sized for your party-goer

2. Draw a vertical line 1.5 inches shorter than line A (9-1.5=7.5), starting in the center of line A and going straight up (line B).
3. Create a triangle (blue in the diagram) by drawing one line from the left end of line A to the top of line B and another line from the right end of line A to the top of line B.
4. Draw another horizontal line parallel to line A and about one inch above it (line C).
5. Sketch a nice smooth curve (green in the diagram) going from the point where line C touches the triangle on the left to the center of line A (the bottom of line B) to the point where line C touches the triangle on the right.
6. Cut out your rounded triangle shape.
7. Fold your shape gently in half to be sure that the straight sides of the trianglish shape are the same length and that the curve is even. Trim the sides and even up the curve as needed.
Your finished shape is approximately 1/6 of a full circle and your pattern to success! Or at least to a successful party hat.
Make the hat
Your fabric and WonderUnder pieces need to be approximately twice the size of your pattern since you'll cut the pattern on the fold. My toddler-sized hat required an approximately 8x14 inch rectangle of each.
1. Fuse (iron) the WonderUnder to the wrong side of your exterior fabric, following the directions on the package.
2. Fold the fabric with the WonderUnder adhered and trace your pattern piece, placing one straight side on the fold.
3. Cut out your traced piece.
4. Carefully peel the paper off the WonderUnder and fuse (iron) the WonderUnder-fabric combo to the wrong side of the interior fabric.
5. Trim the interior fabric so you are left with a double-sided fabric piece that is the double the size of your original pattern piece.
6. Attach any embellishments. I just added a ribbon around the rounded edge of the hat, which will become the brim of the hat, but you could add a monogram, medallion, or myriad other cutenesses.
7. Fold the fabric exterior-sides together (to form a triangle/cone) and sew along the straight side (1/2 inch ish seam allowance) to form a cone.
8. Trim the seam allowance at the point of the cone at a downward angle (so you remove the bulk from the point of the hat).
9. Turn the hat exterior-side out.
10. Thread a sewing needle with approximately 20" of elastic thread.
11. Stitch one end of the thread to one side of the hat and then the other end to the other side of the hat (to leave a long loop) to make the chin strap. Be sure to keep the seam of the hat facing toward the back (in the middle of the two points where you attach the chin strap) while you attach the elastic thread.
Put it on your adorable party-goer's head, grab some balloons, and party on!

Sharing at these fantastic parties:
Subscribe to:
Posts (Atom)


