Mini Meatloaves

Until recently, I thought that meatloaf was very difficult to make, requiring very precise ingredients, and the hand of a gourmet chef (or at least one better than I). Then I made it for the first time. And it turned out great! If I can make a recipe successfully on the first try, anyone can make the recipe!

I have come to love making meatloaf (and meatballs) because I can have the freedom to add whatever I want and whatever I have on hand. My first excursion into Meatloaf Land followed this recipe by Kraft Foods, but since then I have altered it slightly. My hubby pronounces these "good enough that they don't even need to be dipped in more barbecue sauce."


Mini Meatloaves
makes 12 muffin-sized meatloaves

2 lbs ground beef (or pork or turkey)
1 6-oz pkg StoveTop stuffing (any flavor)
2 eggs
1 cup water
3 green onions, chopped
3/4 cup barbecue sauce
1/2 cup grated cheddar cheese
  1. In a large bowl, mix ground beef, StoveTop, eggs, water, green onions, and 1/2 cup barbecue sauce. (I don't like touching the raw meat any more than I have to, so I use my potato masher to mix this part. :) )
  2. Fill 12 greased muffin cups with the meatloaf mixture. 
  3. Top the meatloaves with a thin layer of the remaining barbecue sauce. (I used a pastry brush.)
  4. Bake at 400*F for 30 minutes or until the meatloaf reaches 160*F.
  5. Top with grated cheddar cheese and bake for 5 more minutes or until cheese is melted.
Tada! Our grocery store had a great sale on ground beef this week, so I also made a batch of meatballs (get my recipe here). I made these bite-sized, and I can't wait to try them out in our albondigas on Monday! (We're mixing things up for our Meatball Mondays--I'll let you know how it turns out...)


From left to right: a mini meatball, a small Atomic Fireball (to sub for a marble since apparently we've lost all of ours...), a regular-sized meatball, and a golf ball. Just to show you a size comparison. :)

Restaurant Ripoff: (Smothered) Sweet Pork Burritos

First off, I apologize for the lack of pictures in this post. Apparently, I've never bothered to document the making of the sweet pork burritos. I am okay with this because the burritos don't exactly look like works of art when they are finished. But boy do they taste yummy!

I love Costa Vida's Sweet Pork burritos. I could eat them every day of my life and never get sick of them. This sweet pork satiates my cravings without taking away from the bliss that is the Costa Vida Smothered Sweet Pork Burrito. This is perfect for us, because, as my sister said, "If it was a perfect replica, where would we eat when we go out?" :)

I first based my recipe on this recipe and then altered it from there. I don't make the pico de gallo, so if you want that recipe, you'll have to visit there. :)

Sweet Pork
Pork roast (a 4-5 lb roast makes twice as much sweet pork as we will use for one pan of burritos, so I freeze half of the pork after step 2)
1 cup brown sugar
6-8 oz (half a jar) salsa (medium is best for our tastes)
  1. Place the pork roast in your slow cooker on low for 6 hours or until done. 
  2. Shred the pork and save the juice. [I either do this the day before I want to have the burritos or the day that I get the roast. The cooked and shredded pork and its juices can easily be stored in the freezer until you're ready to use it.]
  3. In the slow cooker, combine the shredded pork with the brown sugar and salsa and about 1/4 cup of the pork juices. [If your salsa has extra large chunks, you might want to run it through a food processor first.]
  4. Cook on low for 3-5 hours or until the pork seems properly infused with the sweetness and heat. [I usually stir once after about 2 hours and taste it to see if I want to add more brown sugar because I like my pork *super* sweet.)
Cilantro Lime Rice
1/4 to 1/2 bunch of fresh cilantro
4 limes' juice (or appx 1/8 cup lime juice)
1 cup rice
2 cups water (or however much your rice cooker requires or you require to make the rice like you want)
  1. Finely chop the cilantro. {Tip: Twist the bunch of cilantro together, like a rope, and then chop it.}
  2. In a pan or your rice cooker, combine rice, water, lime juice, and cilantro.
  3. Cook until the rice is done.
Assemble the burritos
We make our burritos enchilada-style, covered in sauce in a pan that goes in to the oven. Gather your...
Sweet pork
Cilantro lime rice
Black or pinto beans, cooked
Shredded cheese
Green enchilada sauce (14 oz can or larger)
Tortillas (the larger the better)
  1. Fill each of your tortillas with small amounts of sweet pork, cilantro lime rice, and beans. You can also add some cheese and enchilada sauce to the inside of the burrito before you roll it if you'd like. 
  2. Roll each burrito and place it in a glass baking dish. 
  3. Slowly pour the enchilada sauce over the top of the rolled burritos, making sure that the sauce covers all of the tortilla. (You don't want crusty, dried-out tortilla once you take them out of the oven. Yuck!)
  4. Sprinkle the rest of the cheese on top of the burritos.
  5. Cover with aluminum foil.*
  6. Bake at 350 for 20-30 minutes.
*A huge gold star to anyone who can tell me how to prevent the melted cheese sticking to the aluminum foil covering. Please?

Tshirt and denim quilt

I have always loved the idea of making a quilt out of old tshirts, partly because it sounds like a fun challenge and partly because I have a really hard time letting my beloved tshirts go even after I can clearly no longer wear them. :) I also love repurposing jeans into something else, so a few years back I decided I would save my old tshirts and jeans and combine them to make a quilt. Well... I have 4 garbage bags full of old tshirts and jeans in our storage shed. And no quilt...yet. Someday.

BUT last Christmas for our family gift exchange/rotation, I had the pleasure of creating a quilt for my oldest sister, Sarah, out of the 20 or so Harley Davidson tshirts she's collected in her travels. At first I was skeptical thinking that the quilt would be just a bunch of black and orange, but Sarah had collected tshirts in all different colors, and the quilt turned out great! I love it so much I wanted to keep it for myself. That's the spirit of Christmas, right? ;)


Want to make a tshirt quilt of your own? Here's how I did it:

As I had no idea where to start, I turned first to my best friend, Debra, who had made a tshirt quilt the summer before, and to the trusty internet. Along with Debra's instructions, I found these three sites helpful as I planned:
However, being me, I couldn't just make a plain old square-block quilt with sashing. That would have been far too easy and not satisfied my need to complicate things unnecessarily. Thanks to the internet, I found Too Cool Quilt T-shirts, Inc, whose quilts inspired my [insane] decision to cut the tshirt squares to fit the image on the shirt, not to a standard size. I used my dad's [antique and slightly off-square] drafting L square and cut the squares about 1" away from the image on the shirt.

Once I had the tshirt squares cut, I cut muslin (prewashed and ironed) to fit the size of each square to add stability to the knit of the tshirts. **Next time, I will use iron-on interfacing instead (reasons provided later).
For the backing, after much deliberation, I decided to use sweatshirt fleece and just top-stitch the shirts to the backing instead of using batting and then actually quilting or tying the quilt. That choice was inspired by stitch'T, another company that makes tshirt quilts professionally. 

Then, I set out to sketch the quilt:
I kid you not. This is my actual sketch. Once, I was a rocket scientist who was going to be an architect. Drafting like this fulfills my dreams. :)
I plotted out the quilt so that it was just a matter of sewing together a bunch of different rectangles, but so that I could sew straight, full seams for the whole thing. (That might not make sense, but my first draft was completely impossible for me to sew and stay sane due to seams that never met at any corners.) 

Since my squares were not a uniform size at all, I used scraps from the tshirts and pieces of denim from old jeans to fill in the gaps (my sister's idea), just a few inches here and there. This really helped unify the whole quilt and is one of the reasons that I love it so much!

One of my favorite touches: a tag from one of the repurposed shirts. I didn't like how these corners looked coming together, so I covered it up. :)
Start sewing (and biting nails nervously...) I sewed the tshirts (and muslin stabilizer) together using 3/8" seams and a stretch stitch that looks like this: _ _^_ _. I wanted to make sure that there was a little bit of stretch, but, in retrospect, the muslin (or, in the future, interfacing) pretty much overrode the need for stretch. **Next time, I'll just use a straight stitch, which will also make the top-stitching along the seams much easier.

I sewed together 6 smaller sections, and then sewed those together to be the whole quilt. (That's what the numbers are for in the crazy sketch above.)

Celebrate being done with the front of the quilt. And then get back to work.

I am by no means a professional or even experienced quilter, so I decided to use do a self-binding with the sweatshirt fleece, meaning that I just folded the backing around to the front of the quilt. I followed this tutorial here and this tutorial here. I left 4 inches of fleece around the edges so that there would be a larger border showing on the front of the quilt.

Topstitch! It was at this point that I started ripping my hair out and wishing that I had used interfacing instead of muslin. Due to the stretchiness, I ended up with a few gathers/puckers here and there, which could have been avoided, or at least minimized, if the square stabilizer were adhered to the square instead of just sewn together:
Mostly not noticeable...right?
And then present it to the intended receiver, 9 weeks past Christmas. Thanks to a nasty bout of the flu, she also now swears that the quilt has healing powers, so I guess I'm forgiven for the lateness. :)


So...that's it. That's how I made a tshirt quilt that I love and almost made myself insane.

Added 5/21: Joining here!
Photobucket

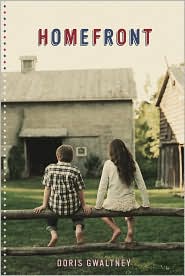
Homefront


Homefront by Doris Gwaltney is a touching story of a young American girl's life before and during WWII. Margaret Ann's cousin, Courtney, comes to live with Margaret's family to escape the blitz on London in 1941. Not only does she take over Margaret Ann's new room, she also monopolizes Margaret's family and friends, including her boyfriend. Margaret and Courtney eventually learn to get a long, but only after Margaret's family has been touched deeply by the war as well.

Final word {contains a few small spoilers}: A. I loved this book. I connected with Margaret like I haven't connected with a character in a novel in a while. Margaret *hates* Courtney, and I hated her too, reading all of the terrible things she does. I also loved her later, once she and Margaret learn to get along.  I cried with her when Courtney claimed the puppy meant for her, and I seethed as Courtney manipulated Margaret's family and friends, getting out of work around the farm and making Margaret (and me) jealous.

Read Across America in style

In case you didn't know, March in National Reading Month and March 2 (tomorrow!) is Read Across America Day, sponsored by the NEA. Why March 2? Because it's the birthday of Dr. Seuss, of course!


My husband's school is also having Crazy Hat Day tomorrow, so when I asked him last week after seeing this tutorial from Mama Lusco if he'd like a hat like The Cat in the Hat, he shocked me by saying yes. (Usually when I ask him about projects I see that I think are awesome, he just gives me a blank look that means "NO!")


I followed Mama Lusco's tutorial... mostly. Given my inability to follow directions, I made only a few changes:
  • Sub on-hand green and yellow felt for red and white
  • Skip the lining. The hat is probably a bit floppier this way, but I like it!
If I were to make another hat I would...
  • Double-check my measurements. Somehow I managed to cut (with my new rotary cutter and mat--woohoo!) one green strip smaller than the others. Hopefully it's not too noticeable...
  • Widen it just a tidge. The 22-inch strips make for a snug fit around my head, so I'd probably add another inch or so there.
Related Posts Plugin for WordPress, Blogger...
 
Blogging tips