Showing posts with label tutorials. Show all posts

Family Rules Subway Art + free file download

Oh me, oh my! Where does the time go?!? I was plugging right along being a good little blogger and then... stuff happened. Beginning of summer fun stuff, freelance work stuff, no more school for hubby stuff, project stuff... You know, stuff. But I do love creating things and sharing them, so I'm really trying to keep up sharing things here.

Today, one of my favorite recent projects: a family rules subway-style wall plaque, custom made for my sister. And, I'm sharing the Silhouette Studio cutting file, too!


My sister sent me a photo of a similar piece of art and asked if I could make her one like it. She didn't care which words or colors I used, just so long as it was a specific size to balance out the art she had hanging on the opposite wall.

Family are great clients to work for :)

I used the same reverse stencil process that I had used on previous canvas projects (which I haven't shared yet, shame!), with just a couple modifications for this since it is on MDF particleboard (cut to size at the store) instead of a canvas.  
1. Paint the canvas or board the color of the LETTERS. I had to do a couple coats of paint since the MDF was thirsty and soaked up a lot of the paint. 

2. Stick on the cut vinyl (or contact paper) letters, smoothing down all of the edges and burnishing really well with a credit card, popsicle stick, or other tool. 

3. Seal (optional) the edges of the vinyl letters with a coat of clear matte ModPodge or other sealant. I only do this if there are very thin portions, such as the serifs of the letters and the thin divider lines. It works like a dream to keep the edges crisp!

4. Paint over the letters in the BACKGROUND color. Mine took 3 coats, but I could have probably done it in two if I was patient and let each coat fully dry. 

5. Peel off the vinyl letters carefully to reveal your beautiful subway art!


I got creative and used a flat egg carton to prop my board up so that I could paint the front and the edges at the same time: 

We hung it with 3M picture hanging strips so that it would be both flat against the wall and secure, since it hangs by the ping-pong table:

Ready to make your own family rules subway art? I'd love to see!

Hop over here to download the Silhouette Studio file (.studio format)

File is for personal, non-commercial use only. Please subscribe to get more free printables and files!

A few notes about the file: 
It is sized to fit a board 14"x24". To cut all of the words, you will have to split it up into sections as your machine can handle. I split mine into 9" tall, since that is the width of my SD's cutting area. If you have a Cameo (lucky!), you can hopefully cut fewer wider strips.

The fonts of each section are listed in the file, and each piece of text is converted to path so you won't need each font. However, if you'd like to make an alteration, here are all of the fonts I used, linked to where you can download them. I have personally downloaded each font from each of the sites I link to, but, as always, you download at your own risk.
Let me know if you have any questions, and thanks for reading!
-Lorene

DIY Washi Tape Switchplates {tutorial}

pretty washi tape switchplates and outlet covers - an easy washi tape craft

If you've been around the crafty blog world much, you've seen washi tape.

More accurately, you've seen ROLLS of washi tape. Full-on collections of beautiful colors and patterns, carefully curated by an adoring crafter.

Because, even more so than with potato chips, you can't have just one roll of washi tape. It's unnatural.

Debra bought me my first few rolls and I've been obsessing and collecting ever since (with a big thanks to Pick Your Plum for making it even more affordable -- and you can also find it at Michael's and Target. It's also called "decorative paper tape" in some stores.)

UPDATE: It's a great day for washi, apparently -- Pick Your Plum has washi tape again this morning! $1.50 a roll and $2.95 shipping in the US (or just a bit more if you're outside the US). This deal always goes quickly, so if you want some, go fast!
pretty washi tape

Thankfully, washi tape is a totally publicly acceptable, and even budget-friendly, obsession.

I even gave out rolls of washi tape at a favorites party I hosted for my sisters back in February (of which I will post details eventually). As I gushed about how amazing it was, I got one question back from every recipient:
But what do you DO with it?

And my nonchalant answer was: 
You stick it on stuff. 
Anything. 
Just stick it on whatever and it will be cute. 

And that is totally true, but... 
[big confession] 
I had never actually used washi tape on anything! 
{hang head in shame}

So, a few weeks later, when we painted our stairway and upstairs hallway, I took the opportunity to put my washi tape on display by letting it work its magic on the switchplates and plug covers before I put them back on, like these I had seen on Crab & Fish. It started out simple:
easy washi tape craft

and then developed into a bit, er, more...
cute washi tape craft

And now the only bare switchplate in my house is the outlet cover behind my couch. (Okay, the ones in the basement are bare, too, but just until I get down there without forgetting my screwdriver.)

I loved the way the pretty switchplates looked on my neutral tan walls upstairs, but I wasn't sure I would like the patterned covers on my pretty blue walls in my kitchen (Belize by Sherwin-Williams). But I love them even more! Love love LOVE them. I squeeed as I installed each and every one --  my husband can confirm. (And even he admits that he likes them -- and everyone who comes to my house comments on my cute light switches!)
cute washi tape switchplates collection

It's super easy. A craft for non-crafters, with a minimal time and money investment. If you want them all to match, one roll of washi tape ($2-4) will do a bunch. I did the first 5 in around an hour, and the next set of 12 took me about 3 episodes of Burn Notice (or just over 2 hours).

Kid's Sewing Kit, version 2.0


Just over a year ago, I made the original Kid's Sewing Kit for one of my nieces. Since then, her younger sister has asked me at least twice a month if I would make one for her. I love when they love what I make for them! So, for her 9th birthday earlier this month, I finally put it together.

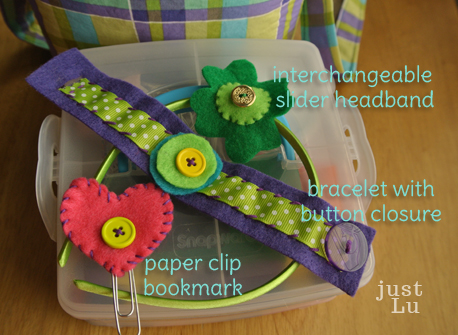
The major improvement in Version 2.0 is a sample of each project for which supplies are included in the kit. Rather than the pre-cut shapes (flowers, hearts, etc) that most store-bought kits have, I just included large pieces of felt in many colors so she can use her own creativity to decide what shapes and colors she wants for which projects. I love seeing what my creative nieces come up with!

I included three simple and skill-appropriate projects:

To make the slider headband, I just stitched a small strip of felt on to the back of the shamrock as I stitched the circle on to the front. Easy peasy, slides right on for a holiday and right back off when the holiday is over.


I picked up another snap n stack organizer from JoAnn's ($4, on sale) and put all the supplies inside:
  • darning needles in a felt needle book (on-hand)
  • embroidery floss (on hand)
  • two small spools of ribbon (clearance $1 for both)
  • a small assortment of buttons, in a tiny dollar store container (on hand)
  • paperclips for the bookmarks (on hand)
  • additional headbands ($1)
  • pre-cut felt strips for bracelets (on hand)
  • large scraps of felt in many colors (on hand)
I would recommend a pair of scissors ($1-2) as well, but I forgot until ten minutes before the party. Oops!

So, my total was $6, but even if you need to buy more of the supplies, you're still looking at an awesome diy gift for the young girl in your life for around $10. 

A few days after I gave this to my delighted niece, her sister attended a "Sew 7" birthday party where each guest had a sewing machine provided to sew a cute little gift bag and a couple other projects. A mini version of this kit would be a fun party favor for a sewing birthday party! 

I grew up sewing and learned most everything I know from my mom, who sewed everything -- including my oldest sister's jeans! -- back when handmade was a necessity and not en vogue. I treasure my basic sewing skills and I love passing the sewing/creating bug on to the next generation. 

Did you grow up sewing or learn as an adult? or are you still a non-sewist? 
(It's okay, I won't judge :)
-Lorene


Yardstick Photo and Decor Hanger (plus St Patrick's Day decor on the cheap)

Remember my two free printables earlier this week? I had every intention of just tossing them in some frames and putting them on my mantel. But then I had a midnight-hour realization: I have no 8x10 frames in my house. Not just no empty-able frames. NO frames. So I started rummaging around and came up with a few office supplies and that turned into this:


It is not what I first envisioned, but I am totally in love with it and can't wait to use it for other holidays, too!

Want to make one of your own? You'll just need
  • a yardstick
  • washi tape (optional, if your yardstick is vintage/pretty i.e., not covered with business info)
  • paper clips (large are better)
  • string (I used baker's twine)
  • hot glue or tape
If your yardstick has unsightly business info all over it (not that Sunroc isn't a great business! love Sunroc :), cover it with washi tape. I was going to leave the measurement side uncovered, but I didn't love that look, so I put two strips of gray polka dot and one strip of pink stripe to jazz it up and help cover the numbers/logo better.


Now, to make the hangers. I call this the poor man's midnight photo hanging solution ;). 

Slightly bend the center section of the paper clip out to form a little hook and tape it on to the yardstick, putting the tape behind the section you just bent out. Note: as I was typing this my shamrock fluttered to the ground... so I'd suggest using tape stronger than washi tape or multiple pieces. You could easily hot-glue the paper clips to the yardstick as well, but I wanted mine to be movable in case the things I want to hang next time are different sizes. 

Then hot-glue a short section of string, knotted at either end to keep it from unraveling and to help hold it in the glue, to the back of the photos and/or lightweight decor that you want to hang. Be sure to glue the string down far enough on the hanging item that the paper clip won't show at the top. (I also glued my photos to poster board to keep them from bending while they're hanging.) 

Having to stretch and use what I have on hand really gets my creative engine going sometimes, so I kept going with the green projects, using what I have on hand. Up there at the top of my yardstick display, I have a crepe paper shamrock. 

I found a shamrock coloring page, traced it on cardboard (the lid of a donut box ;), and then cut it out and glued random spirals of squished and twisted crepe paper streamer until it was covered. Don't look too closely or you'll see the leftover hot glue strings ;)

Hanging next to the yardstick display on our weird stair wall, I just glued some yarn (freehand, in case you can't tell ;) to say lucky... and that is supposed to be a clover on the tail of the y... (The frame is one that I won a while back from Janny at Que Linda. She even gives you the tutorial here! I love it and it fits the holiday perfectly!)


I have one shelf on our front room bookshelf that I put seasonal things on:
An Easter chick masquerades as a leprechaun using the hat I made for my son when he was a baby, and it wouldn't be St. Patrick's day without a pipe cleaner rainbow and the traditional cotton ball clouds!

And then I was on to my mantel. I have only had a mantel for about 6 months and I am still getting a feel for my mantel style... but this one is my favorite yet! Simple but festive. And all from things sitting around my house. Sometimes it pays to hoard ;)
 Just ignore the extra rustic feel... the mantel still needs painted :) From left to right:
  • Hurricane jar with coiled dollar store garland inside, on top of two dollar store bowls
  • Recycled mini Martinelli's bottles with dollar store flowers (whose stems are lengthened with drinking straws)
  • Plain candle on a candle holder, dressed up with more washi tape
  • Milk lid specimen art in white Ribba frame from IKEA
  • Clock from Deseret Book a year or so ago
  • My only still-living plant, in a thrifted ceramic teapot that is normally in my kitchen (propped up with a recycled orange juice concentrate container)
My favorite part? The milk lid specimen art!

So easy. I covered a piece of cardboard with burlap and then just glued the milk lids to it and popped it in the frame. It adds a great color, and I'm thinking how fun it would be with many colors of milk lids. 

Oh, and I don't normally hoard milk lids. I collect them. For my kids. Really, they are great for putting in and out of a wipes container (thank you, Pinterest and Learning Through Play!) and for counting and sorting and stacking. So I put a very small amount of glue on them so my kids won't be green-deficient next time they play ;)

So, how are you decorating for St. Patrick's Day this year? Or are you skipping it since Easter is so close on its tail?

Have a happy {green} day!
-Lorene

Point of View: Pinterest | Intersecting Circle Art

So, today is the Point of View reveal! Don't know what Point of View is? You're missing out! POV is a monthly themed creative collaboration between a handful of "regulars", one guest (that's me, this month!), and, if you'd like, you. Each creative blogger shares a project based on a theme, and then anyone can link up a project relating to their view of that theme. Think of it as one of those craft competitions, minus the competition. :)

I'm so excited to be part of Point of View and share with you one of my *favorite* projects EVER. Our theme this month is Pinterest. If you've made something inspired by a pin, we want to see! (Scroll down to link up.) We have some great projects to share this month:


Keep reading to get the scoop on my Pinterest-inspired project (and link up your own), and please take a minute to check out the other fantastic projects by these amazing ladies:

Ashlee from I'm Topsy Turvy
Gwen from Gwenny Penny

My project this month is this gorgeous (if I do say so myself) intersecting circle art:

In true Pinterest and knock-off fashion, this project is inspired by this paint chip intersecting circle art by Two Girls Being Crafty, which was inspired by a piece from World Market.
World Market: $129 | Two Girls $3 | just Lu $17*

*only because I inadvertently grabbed the wrong type of wood (the $15 expensive-ish type)

The tutorial was one of my first pinned projects. I started it back in October, and being a guest here for POV gave me the proper motivation to get it all finished up.

Those Two Girls have done a great job with the tutorial, I followed it closely and made two separate pieces, mounted on wood planks instead of on a canvas.

I am completely in love with the depth that the wood background gives to the pieces. I used Minwax Dark Walnut stain and it's my new favorite (I'm planning to use it for this shelf next). I bought a 3-foot 1x12 board and had them cut it in half for me at the hardware store, so each plank measures 1x12x18 inches... almost. I will never understand why wood dimensions aren't actually the same as their names.

Anyway, after pulling out my hair figuring out the common denominator of 11.5 and 18 (give or take a 1/4 inch), I used Photoshop to help me draw a circle that was exactly the crazy-right size, and I created my football-ish template from there. (This won't make any sense until you read the tutorial over at Two Girls Being Crafty :)

After hours of tracing and cutting, I adhered each piece semi-permanently to the plank using double-stick tape, so that I could reposition the pieces as needed to make sure that they were arranged how I would like and fit properly to reach the edges of the planks. Once the pieces were where I wanted them, I used a gluestick to adhere each piece permanently, and then sealed the whole shebang (or, I guess, both shebangs) with a matte spray sealant (Krylon Low Odor Clear Finish). The tutorial uses ModPodge, but I do not have a good track record with ModPodge as a sealant for paper that needs to stay flat, so spray was the way to go!

I added a sawtooth hanger to the back of each plank, and up on the wall they went! They brighten my entryway, and I'm sure it will be even better once I choose a family picture to enlarge and hang in between them like this:
one of my favorite photos ever!

or maybe like this:
our Christmas card photo... for the cards we never sent :)

Currently it actually looks like this:
that blue painter's tape is class-y, right?

Gotta love Photoshop for its abilities to twist reality :)

Now, what have you been pinning? Come link up your Pinterest-inspired projects!


Hand-Stamped Scrunchy Tote

I am so in love with my latest creation that I had to forego the normal waiting period (of waaaay too long) to share it with you right away:

My niece turned eight yesterday. Her favorite color is purple and she has been begging for a scrunchy-style bag since I made one for myself in June and another for Debra in July (neither of which I have shared yet... but I will round up some pictures to share soon).

I put off starting this project until yesterday, thinking that I had some great purple fabric in my stash. And... I didn't. Just plain ol' purple. Rather than spend the time and money to run to the store, I decided to exercise my creative muscle that has been getting soft lately. ;)

craft paint + egg carton cups + bottle caps
 (plus a lid from a tub of frosting as a paint tray)
equals...
a fantastic stamped fabric that I couldn't be more pleased with. 

The bottle lids were from a water bottle, a gallon of milk (which is now just sitting lidless in the fridge... small sacrifice for awesome fabric ;), and one of the small bottles of juice. I cut out three individual cups from an egg carton (already empty and in the recycling... I only rob so much from the fridge!) and hot-glued the lids on, two right side up to make the solid circles and one upside down to make the circle outline. You could do without the egg carton cups, but it was SO helpful to have a little more grip on the "stamp".

I watered the craft paint down a little bit as I stamped (maybe 5 drops per medium dollop of paint?). Once the paint was dry, I ironed the fabric to heat-set the paint (since I didn't use fabric paint -- I've never bothered and it doesn't seem to make a huge difference until it's been washed a LOT).


To make the bag, I followed the basics of this tutorial from Nae of Nae Chic. (I followed the tutorial exactly for my first scrunchy bag -- it's a great tutorial for a great bag!). My outer pieces (that I stamped) were about 13"x22", and the interior pieces ended up being 13" square. I also stamped fabric for 3 interior rectangular flat pockets, which I neglected to take a photo of.  The finished bag is just the right size for the Highlights puzzle books I had picked up for her -- or another magazine, notebook, coloring book, text book, etc.

The handle is an old necktie I had in my stash. It was part of a tie skirt I made in high school that I had started to dismantle to remake in an, er, mom size (hips! who knew?) so I had already cut it down to about 16" long and undone the stitching to remove the stabilizer inside.


To make it suitable for a bag handle, I ironed in some fusible fleece (because I had a scrap that fit just right) and sewed a straight stitch down the middle to re-secure the tie in proper shape. I sewed the cut edge into the seam when I sewed the interior and exterior of the bag together, and then I attached the other end (the triangle end) by hand, using a big purple button and purple embroidery floss.


I love it, and my niece was thrilled with it! I can't wait until my own kiddos give such glowing approval of my handiwork :)

I know I've been mostly absent lately, but I am still here and doing all sorts of fun things to share with you. First and foremost, I am SO excited for next week - I am the guest for Point of View this month. The theme is Pinterest, so I finally got around to finishing one of my first Pinterest projects. I hope you'll love it! Tune back in next Friday for the reveal :)


Thanks for reading!

Kid's Sewing Kit [Land of Nod knock-off]

It was my niece's birthday back in October, and as I was thinking of what to do for her, I came across this Land of Nod kids sewing kit, featured over at Gwenny Penny. Lightbulb! (Thanks for the inspiration, Gwen!)

As cute as it was, $31 was out of my budget... not to mention that I have no idea if there is a physical Land of Nod location in my state. I've only ever browsed online for inspiration. :) (If you're interested, theirs is on sale right now for only $17.)

A trip to JoAnn's and a visit to my stash produced...


My out-of-pocket cost was around $13:
  • snap n' stack organizer, $6
  • scissors, $2
  • embroidery floss, $2
  • measuring tape, $1
  • small spool of ribbon, $1
  • googly eyes, $1
  • needles, on-hand (I ended up including one darning needle and one sharper needle, in a simple felt needlebook)
  • felt, on-hand
From my felt, I cut out some fun animal shapes for her to sew together:

The elephant was from this Taffy Talk pattern, and the other shapes were from coloring pages I found various places online.

I also cut out some felt puppets, from She Wears Flowers, and tossed in a few random scraps for her to make her own embellishments.


Just toss the supplies in the tote (or other container), snap it together, and toss a bow on top. Or, if you're like me, skip the bow and make up for it by saying "Happy Birthday!" extra enthusiastically. :)

The Christmas Cheer Garland {Haul Out the Holly}

Haul Out the Holly,Gwenny Penny,Christmas tutorialsToday I am thrilled to be sharing with you as part of Haul Out the Holly, a Christmas crafting extravaganza hosted by my awesome friend, Gwen, of Gwenny Penny. She's lined up 3 weeks of fantastic and talented guests (and then there's me...) to share fun holiday craft ideas with you, so be sure to pop over and check out the amazingness there.

And so, I present, The Christmas Cheer Garland

This garland is as inexpensive and easy as you want it to be, and it's sure to bring a smile to everyone who graces your front door this holiday season. Why? Because, as much as I hate to disagree with Buddy the Elf, the best way to spread Christmas cheer is NOT by singing loud for all to hear (especially if you sing like I do), but by spreading treats far and near...

I learned this truth (along with many others) from fantastic friends of ours. Every year at Christmastime, they bake up a huge batch of sugar cookies, decorate them, and then hang them on their Christmas tree. Every guest who comes to the house then gets to take home a cookie from the tree.

I loved this family tradition of theirs and decided this year to start it with my own family. There were only two problems:
  1. Our (fake) tree is only 3 feet tall.
  2. My husband hates (most) sugar cookies.
So, with a little improvising, we ended up with the Christmas Cheer Garland: individually wrapped treats strung up on the garland by our front door so that each visitor can take a little bit of Christmas cheer (and holiday calories) home.

The Dahlia Top {Toptoberfest}

Toptoberfest! It's the most wonderful time of the year!

In case you haven't heard, Toptoberfest is a fantastic celebration of handmade tops, hosted by Tricia of Leafy Treetop Spot. (You may recognize her from Housewife MacGyver.)

I am so pleased to be participating in Toptoberfest this year with Tricia -- if you're stopping by from Leafy Treetop Spot, welcome! Let's get right down to business and introduce...


The Dahlia Top is a reverse-applique design using two knit fabrics, both old tshirts in this case. That might sound (or look) complicated, but it's really more a matter of patience and time than talent. Trust me -- there's not a particular abundance of patience around my house (especially that's left over for crafts... I figure my children need my patience more than my other creations ;), but there is definitely more patience than artistic or sewing talent. :)

This top was inspired by this top on Etsy. I am a big fan of buying and supporting handmade, but I knew that I could put together a similar top in colors that I really loved for a tiny fraction of the cost. Of the three tops I've made, two of them were free, using only old tshirts that I wasn't wearing anymore. You can't beat free!

The tutorial and template are below -- and you can use the template for so much more than just a top! The same flower would look great on a skirt or a bag or anyplace else that you can think to put it, with any type of fabric -- or even paint! I've provided the template in several different sizes, or you can resize it to fit your projects needs. 

Personalized Picnic Blanket {party or shower activity}

Like I mentioned last week, I'm not a huge fan of shower games -- baby shower, wedding shower, any shower that doesn't actually involve water and cleansing. I know, heresy... but I'm kind of a stick-in-the-mud game-hater anyway. I'm over it :)

To me, a perfect shower activity (call it a game if you must) is one that is casual -- not too structured -- and gives you a reason to talk to the person next to you, who is likely to be a complete stranger or a very distant acquaintance.

Tying a quilt is perfect, but baby quilts are small, meaning that only three or four guests can be involved at the same time, leaving the rest of us twiddling our thumbs.

So, when I was put in charge of the activity portion of my SIL's baby shower last month, I combined the community aspect of tying a quilt with the creative aspect of the everyone-decorate-a-onesie idea... and thus was born the Personalized Picnic Blanket.
{Okay, so this isn't quite the finished version. I finished late one night and forgot to take a picture of the fully finished blanket before giving it to my SIL... sometimes I'm a doofus like that.  This is just missing the snipping-washing-fuzzing part. Sorry.}

It's both a fun activity and a fun keepsake... for any type of shower or party! Just a traditional rag-style denim blanket... personalized. And personalizing it was SO. MUCH. FUN.

Seriously. 12 adults, fully entertained, for over an hour.

So what do you do?

1. Cut out squares of denim (I used 8" squares) from old jeans or denim yardage. You could do cotton or flannel or any other woven fabric as well, but the denim is a fun touch and a nice weight for a picnic quilt. The number of squares you'll want/need will depend on the size and plan of the party -- for our small shower where this was the main activity, each guest did at least 2 squares, and some did 4 or 5.

2. Buy bunches of fabric paint at the craft store. Tip: Use a coupon and buy the big 20-pack. Every color variation known to (wo)man, including florescent and sparkly, for around $10. 20 tubes of paint was more than enough paint for the 40 squares that our guests decorated -- probably enough for at least 40 more.


3. At the shower, turn the guests loose with the fabric paint, decorating the denim squares with pictures, phrases, designs, etc -- or make the quilt a usable signing book and have the guests sign their names and write a little message. Be sure that guests leave the outside 1/2 inch along all the edges blank because fabric paint is a bugger to sew through.

4. Allow the fabric paint to dry. Thoroughly.

5. Sew the denim squares together rag-quilt style, so one side (the back) is flat and the other side (the front) has all the seam allowances showing. (If you need step-by-step instructions, here's a good tutorial. Skip the sewing the X part since your squares are decorated and just place the squares back to back.)

I interspersed my denim squares with fun cotton prints in appropriately boyish colors, but depending on the number of denim squares you have and the size you want the quilt to be, your denim-to-other ratio may be different.

6. Grab your sharp and well-oiled scissors and snip the exposed seam allowances every 1/4 to 1/2 inch and toss the blanket in the washer to properly fluff and fray the edges. Be sure you double-check that you got each and every one!

7. Gift it!

A few notes to help the activity/quilt/party be successful:

Personalizing the squares is easiest when you actually *know* the person that the shower is for, so this is an activity that will be best for a better-acquainted shower group -- think mostly close friends and family, not only coworkers, mere acquaintances, or the extended in-laws.

Because there are bound to be a few guests who either a) don't have that close familiarity with the guest of honor to be able to think of a fun design or b) don't have the creative mojo going that day, provide a few inspiration sheets: a few pages of printed generic clipart designs or related phrases -- "sugar and spice...", gender stereotypical toys like trucks or dolls, fun pattern ideas like zig zags or polka dots, etc. These can help get the creative gears a-grindin' for everyone, not just the people who are feeling stuck.

Provide pencils and paper for sketching designs, as well as some scrap fabric pieces for guests to experiment on, since the fabric paint is permanent and a little intimidating at first.

The fabric paint generally needs at least an hour to dry to the touch -- more if the paint is applied thickly (check the bottle for specific instructions). So, keep that in mind in terms of your venue -- will you have enough space and time for the paint to dry adequately before transporting? This shower was at my sister's neighborhood clubhouse, and so we ended up filling cookie sheets with still-wet fabric squares and walking them the block and a half to her house... where they took over EVERY free inch of horizontal space. Just something to think about as you plan. :)

Mother's Day Etched Vase Tutorial

Keira is here today with a fantastic and inexpensive way to personalize a gift for Mother's Day... or a birthday, or any day really!

One quick note: I used my Silhouette to cut the words for her out of contact paper, but if you don't have access to a fantastic machine like that (my condolences!), you can print the letters/shapes from your computer and then trace and cut them with an x-acto knife on the contact paper, or you can also pick up some stickers at the craft store (or dollar store) and etch around the letters/shapes instead of the letters themselves, like this.

Trying to find a personalized Mother's Day gift? One that hasn't been done before? Or is simply cheap? Look no further, my fellow crafters! I bring you the etched vase--personalized with adjectives and/or nouns that describe your lady, or just a beautiful, simple design to spice up your dollar-store vase. :) Enjoy!


Before I begin with this tutorial, I beg you to use gloves as you work with the etching cream! If you don't believe that the cream can be dangerous, I ask you to glance over this article on it.


What you'll need:

A pair of gloves that can get wet (I use just standard clear plastic food prep gloves)
A pair of scissors
An exact-o knife or something sharp and pokey to pull out the words and/or pictures
Glass etching cream
Plenty of Q-tips
Glass cleaner and paper towels
A vase (duh!), I bought mine at the Dollar store. I saw the same one at Hobby Lobby for $5.99!
Your letters or pictures cut out of vinyl or contact paper
A towel, drop-cloth or plastic bag to cover your work area

What you'll do:

Make sure your words or pictures are correct. Is the spelling of all your words correct? Once you etch them, they're there forever.

Cut out each word or shape from contact paper and place on the vase. I etched the positive space (the words themselves) so I removed that part of the cut design. If you'd rather etch the negative space (the background or non-word part), remove that part of the design. The etching cream will etch whatever is NOT covered by the contact paper.

Clean the vase well with glass cleaner so there are no smudges or fingerprints.

Place the words carefully and make sure there are no bubbles or wrinkles.

Now (using gloves!), cake your cut-outs in etching cream with the Q-tips.

Let stand for as long as you wish--from 5 minutes to 30 minutes. The longer the cream stays on, the deeper and more visible the etch. I left mine on for about 10 or 15 minutes, and I wish I would have left it on longer.

Then scrape the cream off and dump back into the bottle (did you know you can use it over and over??), and rinse in the sink with gloves!

Now remove your vinyl or contact paper and wipe clean and voila! Your own personalized vase! Just deliver with flowers on Mother's Day and you're the talk of the town! :)

What I would do differently:

As I said before, I would leave the cream on longer for a deeper etch. You can see with this vase, the lettering is hard to read!

Secondly, I'd pay more attention to how I painted on my etching cream. I accidentally went "outside the lines" and etched a blotch on the vase. Once you do it, you can't undo it, so be careful and deliberate!

For other ideas:


Don't be limited to vases. Here's a frame I etched with a spiritual quote and a picture of Christ, appropriate for a baptism, wedding, christening or blessing, or an Easter gift. Insert a picture of your family in place of Christ with a quote or song unique to your clan. :) Anything that is glass is up for grabs! Happy Mother's Day crafting to you all!
Related Posts Plugin for WordPress, Blogger...
 
Blogging tips