
Showing posts with label creating. Show all posts

Family Rules Subway Art + free file download

Oh me, oh my! Where does the time go?!? I was plugging right along being a good little blogger and then... stuff happened. Beginning of summer fun stuff, freelance work stuff, no more school for hubby stuff, project stuff... You know, stuff. But I do love creating things and sharing them, so I'm really trying to keep up sharing things here.

Today, one of my favorite recent projects: a family rules subway-style wall plaque, custom made for my sister. And, I'm sharing the Silhouette Studio cutting file, too!


My sister sent me a photo of a similar piece of art and asked if I could make her one like it. She didn't care which words or colors I used, just so long as it was a specific size to balance out the art she had hanging on the opposite wall.

Family are great clients to work for :)

I used the same reverse stencil process that I had used on previous canvas projects (which I haven't shared yet, shame!), with just a couple modifications for this since it is on MDF particleboard (cut to size at the store) instead of a canvas.  
1. Paint the canvas or board the color of the LETTERS. I had to do a couple coats of paint since the MDF was thirsty and soaked up a lot of the paint. 

2. Stick on the cut vinyl (or contact paper) letters, smoothing down all of the edges and burnishing really well with a credit card, popsicle stick, or other tool. 

3. Seal (optional) the edges of the vinyl letters with a coat of clear matte ModPodge or other sealant. I only do this if there are very thin portions, such as the serifs of the letters and the thin divider lines. It works like a dream to keep the edges crisp!

4. Paint over the letters in the BACKGROUND color. Mine took 3 coats, but I could have probably done it in two if I was patient and let each coat fully dry. 

5. Peel off the vinyl letters carefully to reveal your beautiful subway art!


I got creative and used a flat egg carton to prop my board up so that I could paint the front and the edges at the same time: 

We hung it with 3M picture hanging strips so that it would be both flat against the wall and secure, since it hangs by the ping-pong table:

Ready to make your own family rules subway art? I'd love to see!

Hop over here to download the Silhouette Studio file (.studio format)

File is for personal, non-commercial use only. Please subscribe to get more free printables and files!

A few notes about the file: 
It is sized to fit a board 14"x24". To cut all of the words, you will have to split it up into sections as your machine can handle. I split mine into 9" tall, since that is the width of my SD's cutting area. If you have a Cameo (lucky!), you can hopefully cut fewer wider strips.

The fonts of each section are listed in the file, and each piece of text is converted to path so you won't need each font. However, if you'd like to make an alteration, here are all of the fonts I used, linked to where you can download them. I have personally downloaded each font from each of the sites I link to, but, as always, you download at your own risk.
Let me know if you have any questions, and thanks for reading!
-Lorene

The Village Mother, and a Kids-Can-Do Peekaboo Card

I'm still paying homage to the amazing moms of all kinds who have shaped my "mama schema" (read the post to understand what in the world that means :) and sharing simple handmade cards to deliver to these women who have been so influential in my life. Check out today's easy but awesome card tutorial at the bottom of the post: kids-can-do peekaboo art card. 

The Village Mother

A Village Mother is a woman who watches out for my kids, just because. Sometimes when I'm not able to be present (such as when my children go to their classes at church) and other times they take and entertain my children and save my sanity (so grateful for amazing aunts and cousins!)

sorry, Di, this was the only picture I had!
Village mothers take the form of teachers, friends, aunts, cousins, nieces, neighbors, and sisters. (In case you can't tell, I sure love my sisters an awful lot :) You find them at school, at church, around your neighborhood, pretty much anywhere. While my children are ultimately my responsibility, I am sure grateful for the village of support I have!

a few of my amazing nieces
These village mothers love my kids like I do -- they are the second mothers that my children will be remembering and appreciating when they are grown and have kids of their own (but hopefully before then, too).

Most importantly to me, the biggest village mothers in my life play and play and plaaaaay with my children -- reminding me that, in spite of whatever phase they are going through -- my kids are fun.

the best babysitters, er, I mean, sister-in-laws a girl could hope for :)
One of the greatest joys I have discovered since my son was born 3 1/2 years ago is the pure delight that comes from seeing someone else fall in love with my child. Seeing someone else enjoy my child reminds me how much I DO enjoy them, and how I should not just love but also enjoy my child.

So, here's to you, my village mothers! Your adoring fans have made you some awesome (if I do say so myself) cards...


Kids Can Do Peekaboo Cards


The Grand Mother and Washi Tape Stripes Card

As I introduced earlier, this week I'm paying homage to the amazing moms of all kinds who have shaped my "mama schema" (read the post to understand what in the world that means :) and sharing simple handmade cards to deliver to these women who have been so influential in my life. Don't miss today's simple card tutorial at the end of the post: the easiest-ever washi tape card. 


(I had a different type of mother planned for today, but my husband's grandmother passed away last week and we attended her funeral today. And I knew I needed to make sure to recognize that there is just something special about the grandmothers. :)

The Grandest of Mothers


While my mother's mother lost her battle with breast cancer when my mother was only 16,  I was blessed to have a very close relationship with my paternal grandmother, Grandma Ruth, and I married into two amazing grandmothers. All three women were examples of faith and charity, of sticking with it even when times were tough. Two were widowed for many years, and one was plagued with health problems, but throughout everything, they each loved their families and found opportunities to serve and bless many lives. I treasure the memories and family heritage from each of these women, all of whom have passed on.

Since I can't today or on Mother's Day, if you can, give your grandma a hug from me. (Only maybe don't tell her it's from me since that might be weird.)

And then, round up some washi tape and go make the world's easiest diy greeting card.


Washi Tape Stripes Card

Seriously, cards do not get much easier than this.

Start with your blank card -- mine is a piece of cardstock cut in half (hamburger style) and then folded in half. Select 5 or so rolls of washi tape in coordinating colors/patterns.

Starting a few inches up from the edge of the card, line up a strip of tape with the other edge and press it firmly on the front of the card. Leave a tail (long or short - variety is up to you!) and fold it around to the inside of the card. We are decorating both the front and the inside of the card -- go us! :)

With the other colors/patterns of washi tape, continue placing strips of tape at varied heights and of varied lengths along the edge of the card, matching up the edges of the strips but not overlapping them.  Depending on the width of your tape, you may have a small gap at the end. I chose to match up the pattern and have that last stripe be a little bit wider, and then trim the excess tape.

If your original card is a darker color like mine, cut a rectangle of lighter color cardstock just smaller than the size of the card and stick it in the card with double stick tape, so that you can easily see your hand-written note.

See, SO EASY!! And it's adorable on the inside, too (just like yesterday's card :)

Have a happy day,
Lorene

The Sister-Mother and an Easy Hand-Stitched Card

As I introduced yesterday, this week I'm paying homage to the amazing moms of all kinds who have shaped my "mama schema" (read the post to understand what in the world that means :) and sharing simple handmade cards to deliver to these women who have been so influential in my life. Don't miss today's simple card tutorial at the end of the post: a hand-stitched baker's twine card. 


The Sister-Mother

Sister-mothers are the amazing women who are able to act both as mothers -- walking the path before me and teaching me the ropes of womanhood and motherhood -- and as sisters, empathizing and laughing with me when those very same ropes tangled me up and saw me landing flat on my face.


I have the wonderful privilege of having a wonderful community of sister-mothers, both those who are actually genetic sisters and those who have adopted me into their sisterhood.

These women have taught me what true friendship is, 

what true bravery and faith looks like (and that it has a great sense of humor as well!)

what patience and pressing forward mean, 

and what it truly means to enjoy life, regardless of circumstances. 

I hope you each are blessed with wonderful sister-mothers in your life, although mine will always be the best -- not just everyone can be The Sisterhood of the Traveling Sweaty Pants, you know!


And now, the card for today:

Easy Hand-Stitched Baker's Twine Card


A very simple and easy hand-stitched baker's twine card -- start to finish in 15 minutes!


Gather your supplies:
  • plain note card (mine is just a half sheet of white cardstock, folded in half to form a card)
  • paper and pencil
  • baker's twine
  • needle with an eye large enough to fit the baker's twine
Start by deciding what simple shape you want to stitch. I chose a heart. You can draw it right on the front of the card or, if you are a nervous drawer like I am, use the good old graphite-transfer... Draw the shape on a separate piece of paper, and then flip the paper over and fill in the whole area with pencil. Flip the paper back over (so your drawing is now facing you) and place it on top of the card and then, trace firmly over the shape to transfer a very thin outline to the front of the card. 

Then you'll use a sharp needle to poke "pilot holes" for your stitching. Be sure that your card is OPEN and placed on a firm surface that the needle can poke into -- I used my rug, but I usually use a magazine. Poke an EVEN number of holes around the outline of the shape, spaced equally. 

Then thread your needle with an arm's length of baker's twine -- you may need more if you are dong a larger shape with more stitches. The only needle I could find that would accommodate my baker's twine was a darning needle, so I used the smaller, sharper needle on the right to poke the holes and then the darning needle for the stitching. 

Carefully and gently push the needle through the first hole at the top of the heart, leaving a 4-5 inch tail so that you can tie the bow when you are finished.

Place your hand on the back side of where you are stitching to help add strength to the card so that your stitching won't bend or wrinkle the card. 

Gently push the needle back up through the next hole, and then down through the next, making a dashed-style stitched line, until you have completed the circle. If you counted correctly (or just guessed well :), your last stitch will come up close to your first stitch. 

Tie a bow and trim the tails to your desired length. 

My favorite thing about this card (aside from just how easy it is!) is that it looks just as cute on the inside as the outside:

Thanks for reading,
Lorene

DIY Washi Tape Switchplates {tutorial}

pretty washi tape switchplates and outlet covers - an easy washi tape craft

If you've been around the crafty blog world much, you've seen washi tape.

More accurately, you've seen ROLLS of washi tape. Full-on collections of beautiful colors and patterns, carefully curated by an adoring crafter.

Because, even more so than with potato chips, you can't have just one roll of washi tape. It's unnatural.

Debra bought me my first few rolls and I've been obsessing and collecting ever since (with a big thanks to Pick Your Plum for making it even more affordable -- and you can also find it at Michael's and Target. It's also called "decorative paper tape" in some stores.)

UPDATE: It's a great day for washi, apparently -- Pick Your Plum has washi tape again this morning! $1.50 a roll and $2.95 shipping in the US (or just a bit more if you're outside the US). This deal always goes quickly, so if you want some, go fast!
pretty washi tape

Thankfully, washi tape is a totally publicly acceptable, and even budget-friendly, obsession.

I even gave out rolls of washi tape at a favorites party I hosted for my sisters back in February (of which I will post details eventually). As I gushed about how amazing it was, I got one question back from every recipient:
But what do you DO with it?

And my nonchalant answer was: 
You stick it on stuff. 
Anything. 
Just stick it on whatever and it will be cute. 

And that is totally true, but... 
[big confession] 
I had never actually used washi tape on anything! 
{hang head in shame}

So, a few weeks later, when we painted our stairway and upstairs hallway, I took the opportunity to put my washi tape on display by letting it work its magic on the switchplates and plug covers before I put them back on, like these I had seen on Crab & Fish. It started out simple:
easy washi tape craft

and then developed into a bit, er, more...
cute washi tape craft

And now the only bare switchplate in my house is the outlet cover behind my couch. (Okay, the ones in the basement are bare, too, but just until I get down there without forgetting my screwdriver.)

I loved the way the pretty switchplates looked on my neutral tan walls upstairs, but I wasn't sure I would like the patterned covers on my pretty blue walls in my kitchen (Belize by Sherwin-Williams). But I love them even more! Love love LOVE them. I squeeed as I installed each and every one --  my husband can confirm. (And even he admits that he likes them -- and everyone who comes to my house comments on my cute light switches!)
cute washi tape switchplates collection

It's super easy. A craft for non-crafters, with a minimal time and money investment. If you want them all to match, one roll of washi tape ($2-4) will do a bunch. I did the first 5 in around an hour, and the next set of 12 took me about 3 episodes of Burn Notice (or just over 2 hours).

Kid's Sewing Kit, version 2.0


Just over a year ago, I made the original Kid's Sewing Kit for one of my nieces. Since then, her younger sister has asked me at least twice a month if I would make one for her. I love when they love what I make for them! So, for her 9th birthday earlier this month, I finally put it together.

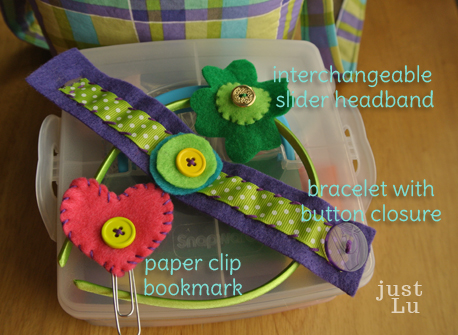
The major improvement in Version 2.0 is a sample of each project for which supplies are included in the kit. Rather than the pre-cut shapes (flowers, hearts, etc) that most store-bought kits have, I just included large pieces of felt in many colors so she can use her own creativity to decide what shapes and colors she wants for which projects. I love seeing what my creative nieces come up with!

I included three simple and skill-appropriate projects:

To make the slider headband, I just stitched a small strip of felt on to the back of the shamrock as I stitched the circle on to the front. Easy peasy, slides right on for a holiday and right back off when the holiday is over.


I picked up another snap n stack organizer from JoAnn's ($4, on sale) and put all the supplies inside:
  • darning needles in a felt needle book (on-hand)
  • embroidery floss (on hand)
  • two small spools of ribbon (clearance $1 for both)
  • a small assortment of buttons, in a tiny dollar store container (on hand)
  • paperclips for the bookmarks (on hand)
  • additional headbands ($1)
  • pre-cut felt strips for bracelets (on hand)
  • large scraps of felt in many colors (on hand)
I would recommend a pair of scissors ($1-2) as well, but I forgot until ten minutes before the party. Oops!

So, my total was $6, but even if you need to buy more of the supplies, you're still looking at an awesome diy gift for the young girl in your life for around $10. 

A few days after I gave this to my delighted niece, her sister attended a "Sew 7" birthday party where each guest had a sewing machine provided to sew a cute little gift bag and a couple other projects. A mini version of this kit would be a fun party favor for a sewing birthday party! 

I grew up sewing and learned most everything I know from my mom, who sewed everything -- including my oldest sister's jeans! -- back when handmade was a necessity and not en vogue. I treasure my basic sewing skills and I love passing the sewing/creating bug on to the next generation. 

Did you grow up sewing or learn as an adult? or are you still a non-sewist? 
(It's okay, I won't judge :)
-Lorene


Lucky Milk Lid Specimen Art

Goodness, this week has flown by! We've been organizing up a storm, and I'll have some fun projects to share next week. Today I want to share a super fast update to the milk lid specimen art from last week.

My friend Amy suggested that I paint one of the milk lids gold to make it pop and be more festive, but... paint sounded like work. And drying time. So instead I cut a four leaf clover from some brushed gold vinyl (using my Silhouette... I'm old-school SD not new Cameo :), and stuck it on one of the milk lids.

As a bonus, the vinyl will peel right off once I decide to take the art down and let my kids have their milk lids back to play with. But... let's be honest... those kids are never getting these green milk lids back. And the other colors are in danger, too, because momma is loving on how easy and cheap milk lid specimen art is! Next time, though, I think I will leave some space between the milk lids to give it more of a specimen feel. And there will be a next time. :)

Happy St. Patrick's Day!
-Lorene


Yardstick Photo and Decor Hanger (plus St Patrick's Day decor on the cheap)

Remember my two free printables earlier this week? I had every intention of just tossing them in some frames and putting them on my mantel. But then I had a midnight-hour realization: I have no 8x10 frames in my house. Not just no empty-able frames. NO frames. So I started rummaging around and came up with a few office supplies and that turned into this:


It is not what I first envisioned, but I am totally in love with it and can't wait to use it for other holidays, too!

Want to make one of your own? You'll just need
  • a yardstick
  • washi tape (optional, if your yardstick is vintage/pretty i.e., not covered with business info)
  • paper clips (large are better)
  • string (I used baker's twine)
  • hot glue or tape
If your yardstick has unsightly business info all over it (not that Sunroc isn't a great business! love Sunroc :), cover it with washi tape. I was going to leave the measurement side uncovered, but I didn't love that look, so I put two strips of gray polka dot and one strip of pink stripe to jazz it up and help cover the numbers/logo better.


Now, to make the hangers. I call this the poor man's midnight photo hanging solution ;). 

Slightly bend the center section of the paper clip out to form a little hook and tape it on to the yardstick, putting the tape behind the section you just bent out. Note: as I was typing this my shamrock fluttered to the ground... so I'd suggest using tape stronger than washi tape or multiple pieces. You could easily hot-glue the paper clips to the yardstick as well, but I wanted mine to be movable in case the things I want to hang next time are different sizes. 

Then hot-glue a short section of string, knotted at either end to keep it from unraveling and to help hold it in the glue, to the back of the photos and/or lightweight decor that you want to hang. Be sure to glue the string down far enough on the hanging item that the paper clip won't show at the top. (I also glued my photos to poster board to keep them from bending while they're hanging.) 

Having to stretch and use what I have on hand really gets my creative engine going sometimes, so I kept going with the green projects, using what I have on hand. Up there at the top of my yardstick display, I have a crepe paper shamrock. 

I found a shamrock coloring page, traced it on cardboard (the lid of a donut box ;), and then cut it out and glued random spirals of squished and twisted crepe paper streamer until it was covered. Don't look too closely or you'll see the leftover hot glue strings ;)

Hanging next to the yardstick display on our weird stair wall, I just glued some yarn (freehand, in case you can't tell ;) to say lucky... and that is supposed to be a clover on the tail of the y... (The frame is one that I won a while back from Janny at Que Linda. She even gives you the tutorial here! I love it and it fits the holiday perfectly!)


I have one shelf on our front room bookshelf that I put seasonal things on:
An Easter chick masquerades as a leprechaun using the hat I made for my son when he was a baby, and it wouldn't be St. Patrick's day without a pipe cleaner rainbow and the traditional cotton ball clouds!

And then I was on to my mantel. I have only had a mantel for about 6 months and I am still getting a feel for my mantel style... but this one is my favorite yet! Simple but festive. And all from things sitting around my house. Sometimes it pays to hoard ;)
 Just ignore the extra rustic feel... the mantel still needs painted :) From left to right:
  • Hurricane jar with coiled dollar store garland inside, on top of two dollar store bowls
  • Recycled mini Martinelli's bottles with dollar store flowers (whose stems are lengthened with drinking straws)
  • Plain candle on a candle holder, dressed up with more washi tape
  • Milk lid specimen art in white Ribba frame from IKEA
  • Clock from Deseret Book a year or so ago
  • My only still-living plant, in a thrifted ceramic teapot that is normally in my kitchen (propped up with a recycled orange juice concentrate container)
My favorite part? The milk lid specimen art!

So easy. I covered a piece of cardboard with burlap and then just glued the milk lids to it and popped it in the frame. It adds a great color, and I'm thinking how fun it would be with many colors of milk lids. 

Oh, and I don't normally hoard milk lids. I collect them. For my kids. Really, they are great for putting in and out of a wipes container (thank you, Pinterest and Learning Through Play!) and for counting and sorting and stacking. So I put a very small amount of glue on them so my kids won't be green-deficient next time they play ;)

So, how are you decorating for St. Patrick's Day this year? Or are you skipping it since Easter is so close on its tail?

Have a happy {green} day!
-Lorene
Related Posts Plugin for WordPress, Blogger...
 
Blogging tips